
Replacing a damaged or unstable office chair base is a highly effective way to extend the lifespan of your seating without the expense of purchasing an entirely new chair. Over years of daily use, the structural integrity of a chair base can degrade, leading to hairline cracks, bent legs, or a noticeable tilt that compromises your posture. Fortunately, the connection between the chair’s gas lift cylinder and the base relies on a simple tapered friction fit, meaning you can easily swap out a worn base using basic household tools. By selecting a compatible replacement and following a systematic removal and installation process, you can restore your chair’s stability and smooth mobility in under thirty minutes.
This guide provides a comprehensive, step-by-step walkthrough to help you safely detach your old chair base, prepare your workspace, install the new component, and perform essential safety checks to ensure long-term reliability.
Assessing Compatibility Before You Buy a Replacement Base
Before purchasing a replacement office chair base, you must verify several critical dimensions to ensure a seamless fit with your existing chair components. The most vital measurement is the center hub diameter, which accommodates the gas lift cylinder. While a large majority of modern office chairs utilize a standard two-inch (approximately 50mm) tapered cylinder, some specialized or older models may feature proprietary dimensions. Using a digital caliper or a flexible measuring tape, measure the outer diameter of your current cylinder near the point where it enters the base to guarantee your new base will accept it without slipping or binding.
Products mentioned in this guide
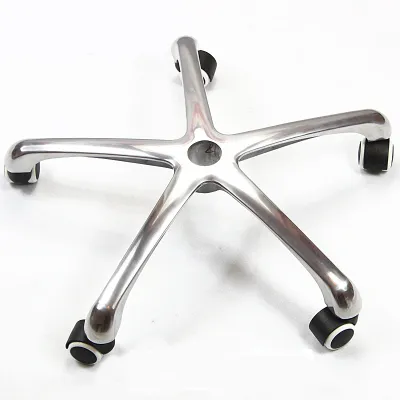
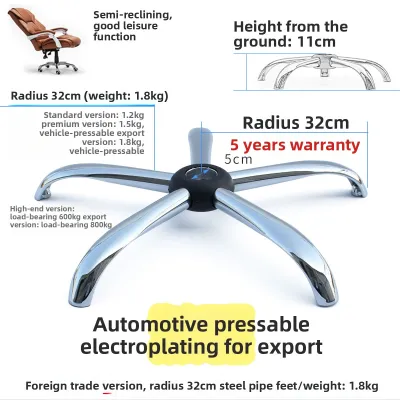
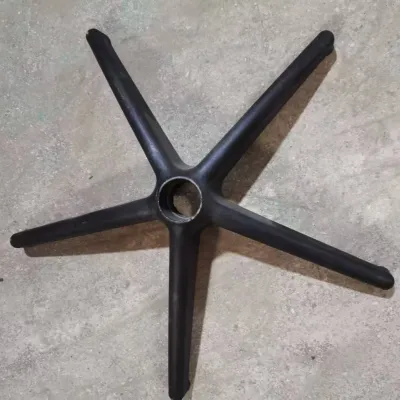
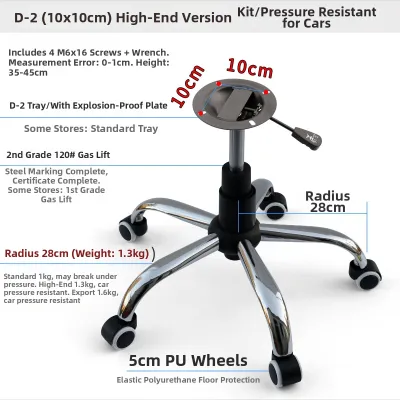
Prices are valid at publication and may change. Please refer to the product page for the latest price.
Next, examine the caster stem dimensions, as replacement bases do not always come with new wheels. Casters are typically secured by a metal stem that snaps into sockets on the underside of each base arm. The standard stem size for most office chairs is a grip ring stem measuring 11mm in diameter by 22mm in length. However, certain brands and compact models use a smaller 10mm stem. Pull one of your current casters out of its socket and measure the stem diameter carefully; choosing a base with incompatible socket sizes will prevent you from reusing your existing wheels.
Structural geometry and weight capacity are equally important considerations for long-term safety. Count the number of arms on your current base, which is almost universally a five-star design to prevent tipping when reclining or swiveling. When selecting a replacement, review the manufacturer’s specifications for its maximum weight rating. If you are upgrading, opting for a heavy-duty reinforced nylon, polished aluminum, or steel base can provide greater structural rigidity than standard plastic alternatives.
Finally, consider how the base material and finish interact with your specific work environment. In humid tropical climates, steel bases without adequate powder coating or chrome plating can eventually develop surface rust if exposed to moisture. Reinforced nylon bases offer excellent resistance to humidity and impact, while solid aluminum bases provide a premium aesthetic and high load capacity. Ensure the material you select aligns with both your aesthetic preferences and the environmental conditions of your home office.
Gathering the Right Tools and Preparing Your Workspace
Having the correct tools on hand before you begin will prevent unnecessary frustration and protect your chair from accidental damage. You will need a high-quality rubber mallet to safely tap the old base loose without marring the metal or plastic. A pipe wrench or a specialized cylinder removal tool is highly recommended if you also need to separate the gas cylinder from the seat mechanism. Additionally, keep a can of penetrating lubricant nearby to help loosen joints that have become tightly wedged together over years of weight-bearing use.

Because the removal process can release built-up grease, metal shavings, or lubricant drips, preparing your workspace is essential. Lay down a thick canvas drop cloth, heavy blanket, or large piece of corrugated cardboard over your flooring. This protective barrier is especially important on hard surfaces such as parquet, vinyl, or engineered wood, which can easily scratch if a heavy metal cylinder or tool is dropped. Wearing a pair of durable work gloves will also protect your hands from pinch points and greasy residue during handling.
Clear a spacious, well-lit area of at least two square meters to allow yourself ample room to maneuver. You will need to invert the chair completely, so ensuring there are no nearby walls, delicate glass desks, or electronic equipment will prevent accidental collisions. If your chair has highly adjustable armrests or a delicate headrest, consider removing them or adjusting them to their lowest positions to stabilize the chair when it is turned upside down.
How to Safely Remove the Old Office Chair Base
To begin the removal process, carefully invert your office chair so that the base faces upward and the headrest or backrest rests securely on your protected floor. If the chair feels top-heavy or unstable in this position, ask a helper to hold the seat steady, or wedge the seat firmly between two stable objects. Once the chair is secure, remove the casters by grasping each wheel firmly and pulling it straight out of its socket. If a caster is stuck, gently wedge a flathead screwdriver between the caster stem collar and the base arm to pry it upward until it pops free.
With the casters removed, locate the joint where the bottom of the gas lift cylinder penetrates the center collar of the chair base. Over time, the downward force of sitting wedges this tapered connection incredibly tight. Spray a generous amount of penetrating lubricant directly into the seam where the cylinder meets the base. Allow the lubricant to sit for ten to fifteen minutes, giving it sufficient time to seep into the microscopic gaps between the metal surfaces and break down any accumulated rust or friction.
Once the lubricant has settled, hold the edge of one of the base arms with one hand to stabilize it. Using your other hand, strike the underside of the base collar firmly with a rubber mallet, aiming close to the center cylinder. Do not strike the gas cylinder itself, as denting the pressurized chamber can ruin its internal seals or cause a safety hazard. Rotate the base slightly after each blow, striking different sides of the collar to distribute the force evenly and rock the tapered joint loose. If the base does not budge after several firm strikes, stop and apply more penetrating oil, or use a specialized cylinder removal tool to apply mechanical leverage rather than excessive physical force.
If your replacement project also requires detaching the gas cylinder from the seat mechanism plate, you must exercise caution to avoid damaging the adjustment levers. Clamp a heavy-duty pipe wrench tightly around the upper portion of the cylinder, just below the seat plate. Twist the wrench firmly while pulling upward on the base and cylinder assembly; the twisting motion will break the friction seal, allowing the cylinder to slide out of the seat mechanism. Always ensure your face and body are kept clear of the cylinder’s path during this step, as the parts can separate suddenly under tension.
Installing the New Base and Reattaching the Seat
With the old base successfully removed, assembling your new base is a straightforward process that requires no specialized tools. Begin by preparing your new base and inserting the casters. Align the metal stem of each caster with the socket on the underside of the base arms, then push downward with firm, steady pressure. You should feel or hear a distinct click as the grip ring on the stem compresses and locks into the socket. If a stem is particularly stubborn, a gentle tap on the caster wheel with a rubber mallet can help seat it fully, but avoid using excessive force that could crack the caster housing.
Once all five casters are securely installed, flip the base over so it sits upright on its wheels on a flat, level surface. Take your gas lift cylinder and insert the wider, bottom end directly into the center hub of the new base. Ensure the cylinder is perfectly vertical and sits flush within the opening. The tapered design of both the cylinder and the base collar ensures that they will self-align and lock together naturally under downward pressure, so there is no need to hammer or force the cylinder into place.
Next, lift the entire upper seat assembly of your chair and align the central hole of the seat control mechanism directly over the top of the gas cylinder’s silver activating button. Carefully lower the seat plate onto the cylinder, ensuring the tapered tip enters the receiver smoothly without tilting. Once the seat is resting on the cylinder, gently sit in the center of the chair. Your body weight will apply the necessary downward force to wedge the tapered joints of both the seat plate and the base securely onto the cylinder, completing the friction fit.
Always consult the specific product manual that accompanied your replacement base before finalizing the assembly. While most standard bases rely entirely on a tool-free friction fit, some heavy-duty or specialized ergonomic models may include retaining clips, washers, or specific fastening screws that must be installed in a precise order. Verifying these details beforehand ensures you do not overlook any unique safety components designed to keep the base securely attached during dynamic movement.
Post-Installation Testing and Safety Checks
Before returning your newly repaired chair to daily service, you must perform a series of quick safety checks to verify its structural integrity. Start by placing the chair on a flat, even floor and checking for any lateral wobbling. Gently rock the chair from side to side and front to back; if you detect any unevenness, double-check that all five casters are fully pressed into their sockets and that the gas cylinder is sitting perfectly perpendicular within the base hub.
Next, sit in the chair and test the height adjustment lever to ensure the pneumatic system is functioning correctly. Raise the chair to its maximum height, sit down, and then lower it to its lowest setting. The cylinder should glide smoothly without catching, grinding, or slipping. Once you set the chair to your preferred working height, remain seated for a few minutes to confirm that the cylinder holds its pressure consistently and does not slowly sink under your weight.
Finally, perform a full 360-degree rotation while seated to verify that the swivel mechanism operates quietly and without resistance. Listen closely for any unusual grinding, clicking, or squeaking noises, which could indicate that the cylinder is rubbing against the bottom of the new base or that the internal bearings require lubrication. If the chair sinks unexpectedly or feels unstable during these tests, disassemble the components, clean any debris from the tapered joints, and reseat the cylinder firmly to establish a secure connection.
Frequently Asked Questions (FAQ)
Can I reuse the old gas cylinder with a new base?
Yes, you can generally reuse your existing gas cylinder with a new base, provided the cylinder is undamaged and matches the center hub diameter of the replacement base. Before reassembling the chair, inspect the cylinder thoroughly for any signs of structural wear, such as deep rust, bending, or oily residue leaking from the seals. If your current cylinder has been slipping, sinking slowly during the day, or making grinding noises when swiveling, it is highly recommended to replace both the cylinder and the base at the same time. Replacing them together is much more efficient, as removing a stuck cylinder from an old base can be difficult, and installing a fresh cylinder ensures your chair will remain fully functional for years to come.
What should I do if the gas cylinder is stuck in the old base?
If the gas cylinder is tightly seized inside the old base, start by applying a generous amount of penetrating oil directly to the joint and letting it sit for at least thirty minutes to break down friction. Instead of striking the cylinder directly with a standard metal hammer—which can dent the pressurized chamber and ruin the internal mechanism—use a specialized gas lift removal tool or a heavy-duty pipe wrench to twist the cylinder back and forth until the friction seal breaks. If the cylinder remains completely stuck after multiple attempts and reasonable physical effort, stop trying to force it. Attempting to remove a severely seized cylinder with excessive force can lead to injury or damage to the seat plate; in this scenario, the safest and most practical solution is to purchase a new gas cylinder along with your replacement base.

Community discussion
Share your experience or ask a question. Comments are reviewed before publication.