
Selecting the ideal capacity for a shoe organizer stack requires balancing your current footwear inventory with the physical limits of your home’s entryway. Instead of guessing or buying a generic rack that either overflows or leaves empty shelves, a systematic approach ensures every pair has a home. By auditing your collection, measuring your floor and wall space, and calculating the exact dimensions needed per tier, you can build a stable, modular storage system that keeps your home organized and clutter-free.
Audit Your Shoe Collection and Growth
Start by gathering and counting every pair of shoes currently in use, stored away, or kept for special occasions to establish an accurate baseline. Group them into clear categories: daily wear, formal shoes, athletic trainers, and seasonal or specialty footwear.
Next, sort these groups by height. Low-profile shoes like flats, sandals, and loafers require minimal vertical clearance, whereas high-top sneakers, heels, and boots need significantly more space. Note down the quantity in each height category to determine how many standard and tall tiers you will need.
Products mentioned in this guide
![[2021 NEW] Premium Ultimate Big Capacity Full Acrylic Stackable Magnetic Side Open Display Sneakers Shoes Boxes Sneaker Storage Shoe Rack](https://img.lazcdn.com/g/p/42ac334d1dc8510716de63969699994d.jpg_400x400q80.jpg_.webp)
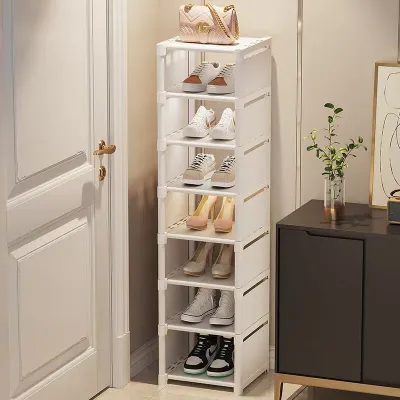
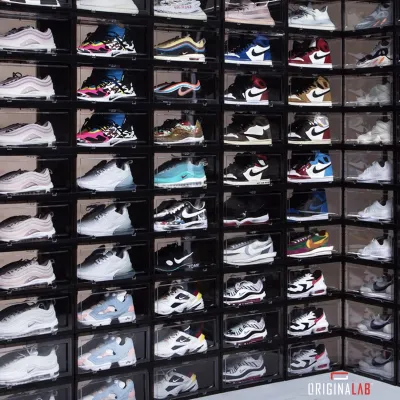
Prices are valid at publication and may change. Please refer to the product page for the latest price.
Consider implementing a seasonal rotation strategy to optimize your entryway capacity. If you have limited space, keep only your active, daily-wear pairs in the primary entryway stack, and store off-season or specialty footwear in closets or under-bed storage.
Finally, plan for future acquisitions. If you regularly purchase new footwear or need to accommodate growing children, add a buffer of about 10% to 15% to your total capacity. This prevents your new organizer from becoming obsolete within a few months, while keeping you from overbuying unnecessary modules that waste valuable floor space.
Calculate Tiers and Pairs-Per-Tier
Translating your shoe count into physical dimensions involves simple division based on your available horizontal space. First, determine how many pairs can fit on a single tier. A standard pair of adult shoes typically requires 20 to 25 centimetres of horizontal shelf width. Measure the width of the area where you plan to place the organizer, and divide this width by the average width of your shoes to find your pairs-per-tier capacity.

For example, a shelf width of 75 centimetres can comfortably hold three pairs of standard adult shoes. Once you have this number, divide your total shoe count by the pairs-per-tier to determine the total number of tiers required. If you have 15 pairs of shoes and your chosen width accommodates 3 pairs per tier, you will need a 5-tier stack.
For a larger household, a collection of 24 active pairs using a 100-centimetre organizer (fitting four pairs per tier) will require a 6-tier stack. Adjusting the width of the unit allows you to control the height of the stack, keeping the storage system within safe physical limits.
Remember to adjust this calculation for bulkier footwear. Wide running shoes, heavy work boots, or platform heels may require more horizontal space per pair, which might reduce the pairs-per-tier capacity or require you to allocate specific wider tiers for these items.
Measure Your Available Space and Clearance
Before purchasing any modular components, you must verify that the calculated stack fits your home’s physical layout. In Singapore, where entryway space in HDB flats and apartments is often compact, precise measurements are essential. Use a measuring tape to determine the maximum floor footprint—both width and depth—available for the organizer’s base.
Remember to account for skirting boards, which can prevent a shoe rack from sitting flush against the wall and reduce your available floor depth by one to two centimetres. This small gap can cause a wider unit to protrude unexpectedly into your walking path.
Ensure the depth of the unit allows your largest shoes to sit fully on the shelf without protruding into walking paths. Next, assess the vertical clearance. Measure from the floor to any overhead obstructions, such as light switches, wall-mounted mail organizers, or electrical distribution boards.
If you plan to place the stack behind a door, measure the door swing clearance to ensure the door can open fully without striking the organizer. Additionally, check the width of the adjacent pathway. For safety and comfort, entryways and corridors should maintain a clear passage—ideally at least 1.2 metres in shared corridors—to allow residents and guests to move freely without bumping into the storage unit.
Evaluate Stackable Configurations and Stability
A tall shoe stack must remain stable under the weight of your collection. When choosing a modular system, check the manufacturer’s specifications for the maximum load capacity of each individual tier and the fully assembled stack. Distribute the weight logically by placing your heaviest footwear, such as boots and leather dress shoes, on the bottom tiers to lower the center of gravity.
Examine the interlocking mechanisms that connect the tiers. High-quality stackable systems use secure dowels, clips, or interlocking grooves to prevent the units from shifting or sliding. Avoid stacking units higher than the manufacturer’s recommended limit, as excessive height can compromise structural integrity.
Material choice also plays a significant role in both stability and maintenance. In humid climates, open wire or slatted wooden tiers promote airflow to prevent mold. If you choose plastic modular boxes, ensure they have built-in ventilation holes to keep the air circulating around your footwear.
If you live in a household with pets or young children, or if your stack exceeds four tiers, look for units that include wall-anchoring hardware or anti-tip kits to secure the organizer firmly to the wall. Check the joints and frame stability during assembly to ensure a secure fit.
Common Sizing Mistakes to Avoid
One of the most frequent errors is assuming that all tiers in a stackable system offer the same vertical clearance. Many standard organizers are designed solely for flat shoes, leaving no room for high-tops or ankle boots unless you remove a shelf or purchase specialized tall modules.
Another common oversight is ignoring shelf depth. If your household includes members with larger shoe sizes, standard-depth shelves may cause the heels or toes of the shoes to overhang, creating an untidy look and a tripping hazard in tight hallways. Always compare the outer sole length of your largest shoes against the usable depth of the organizer.
Lastly, avoid the temptation to stack modules indefinitely. Even if a system is marketed as infinitely expandable, stacking beyond a safe, stable height without proper wall anchoring risks a structural collapse that could damage your footwear or cause injury.
Frequently Asked Questions (FAQ)
Can I mix different shoe types on the same tier?
Yes, you can mix different shoe types on a single tier, but doing so requires strategic placement to maximize space. Grouping shoes of similar heights together on the same shelf prevents wasted vertical space. For instance, placing flats next to low-profile sneakers allows you to use a lower-clearance tier, saving taller tiers for boots and heels. If your stackable organizer features adjustable shelves, you can customize the height of individual tiers to match your mixed collection perfectly.
How do I know if a tall shoe stack will tip over?
A tall shoe stack is at risk of tipping if its height greatly exceeds its base depth or if the heaviest items are placed near the top. To evaluate stability, check the product’s base-to-height ratio; taller, narrower units are inherently less stable. Always place heavy footwear on the lowest shelves to maintain a low center of gravity. If the stack feels wobbly when gently shaken, or if it exceeds one metre in height, you should secure it to the wall using the manufacturer’s recommended anchoring brackets or anti-tip straps.

Community discussion
Share your experience or ask a question. Comments are reviewed before publication.