
The type of hole cover you need depends on the hole’s function, size, and location. For exposed screws or cam locks on flat surfaces, you need screw hole caps (either adhesive or push-in). For managing power cords on desks or TV consoles, you need a cable grommet. For sealing empty, obsolete, or accidental holes, a decorative plug or blank cover is best.
Empty holes in furniture can ruin the clean lines of your home. Whether you are assembling flat-pack wardrobes, rerouting home office electronics in a Singapore flat, or fixing an accidental drilling mistake, finding the right cover restores both function and aesthetics. Understanding the differences between these accessories ensures a seamless, professional finish.
Diagnose the Hole: What Is Its Purpose?
Before purchasing any hardware, inspect the furniture piece carefully to identify why the hole is there. Start by observing its location. A hole on the inside panel of a wardrobe serves a very different purpose than one on top of a study desk or along the outer frame of a bookshelf. Identifying this context prevents you from buying the wrong type of cover.
Products mentioned in this guide
![Polished Chrome Zinc Alloy Computer Round Hole Cover Desk Table Metal Grommet Cable Cord Hole Cover Home & Office [Available Hole Size: 60 mm / 80 mm]](https://img.lazcdn.com/g/p/c678241c5da3a1eebce9f04b4a5efa02.jpg_400x400q80.jpg_.webp)
Prices are valid at publication and may change. Please refer to the product page for the latest price.
Structural holes are engineered during manufacturing to facilitate joint connections. These are typically small, clean-cut, and deep, designed to house cam locks, dowels, or assembly screws. They are crucial for holding the piece together but are often left exposed, disrupting the visual flow of the wood or laminate surface.
Functional holes are larger, deliberate cutouts designed specifically for routing power, internet, or display cables. You will commonly find these on office desks, TV consoles, and bedside tables. They are meant to keep cords organized and prevent them from tangling behind the furniture.
Accidental or obsolete holes are the result of wear and tear, DIY mistakes, or changing needs. These include stripped screw holes, misplaced drill marks, or empty spaces left behind after you remove old cabinet handles or hardware. These require creative solutions to hide the damage without rebuilding the entire panel.
To help you decide on the right solution, use this quick diagnostic guide:
- If wires or cords pass through the opening: You need a cable grommet to protect the wires and keep the desk tidy.
- If the hole contains a visible screw head, bolt, or cam lock: You need a screw hole cap to conceal the metal fastener.
- If it is a small, empty, unused hole (under 15mm): You need a push-in plastic plug or a self-adhesive cover.
- If it is a large, unused cutout (over 50mm): You need a blank grommet or a solid wood plug to seal the surface.
Screw Hole Caps: For Concealing Fasteners and Joints
Screw hole caps are the go-to solution for ready-to-assemble (RTA) furniture, such as modular wardrobes, kitchen cabinets, and bed frames. These pieces rely heavily on metal cam locks and screws that remain visible after assembly. Adding a simple cap instantly elevates the furniture, giving it a custom, high-end appearance.

When selecting screw hole caps, precise measurement is essential. You must measure the exact diameter of the recess. Standard furniture assembly holes typically measure 10mm, 12mm, or 15mm in diameter. Additionally, check the depth of the hole; if the screw head sits too close to the surface, a deep-shank push-in cap will not sit flush and will stick out awkwardly.
You will generally find three main types of screw hole caps:
- Peel-and-Stick Veneer Caps: These are ultra-thin, flat disks made of PVC or real wood veneer with a strong self-adhesive backing. They are ideal for flat surfaces because they create almost no protrusion, making them virtually invisible.
- Push-In Plastic Caps: These feature a small ribbed shank or stem on the back that friction-fits directly into the drive of the screw (such as a Pozidriv or Phillips head) or into the surrounding wood hole. They offer a secure, mechanical hold.
- Self-Adhesive Rigid Caps: Made of thicker plastic, these caps provide excellent impact resistance and are perfect for high-traffic areas where thin stickers might get scratched or peeled off.
To achieve a seamless look, match the cap’s color and wood grain pattern visually to your furniture’s laminate or veneer rather than relying on generic color names like “oak” or “white.” Because Singapore’s tropical climate brings high humidity, always check the product label to ensure the adhesive or plastic is rated for indoor use and can withstand moisture without peeling over time.
Cable Grommets: For Managing Wires and Cords
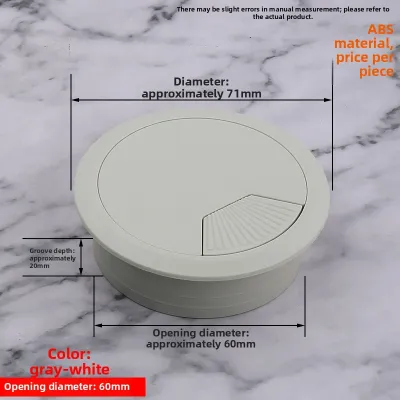
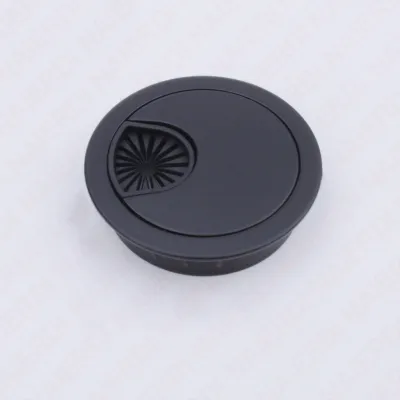
Cable grommets are designed for office desks, study tables, and media consoles. These furniture pieces often feature large circular cutouts to allow bulky power plugs and USB cords to pass through safely. An open, unfinished hole looks untidy and can scrape against delicate cables, making a grommet a necessary addition.
Desk grommets are significantly larger than screw caps, typically standardizing around 60mm or 80mm in diameter. When shopping for a replacement, always measure the inner diameter of the bare wooden hole itself. Do not measure the old, broken plastic cover you are replacing, as different brands have slightly different outer lip dimensions.
Modern cable grommets come with several useful features to keep your workspace organized:
- Flip-Lids: These allow you to close the opening partially when only a few thin wires are present, keeping the desk surface looking clean.
- Brush Inserts: These feature dense nylon bristles that allow cables to pass through while blocking dust, dirt, and small stationery items from falling into the gap.
- Removable Center Pieces: These allow you to pass large UK or Singapore three-pin power plugs through the wide opening first, after which you can snap the collar back in to narrow the space around the thinner cords.
Most cable grommets use a simple drop-in or snap-in mechanism. Before purchasing, verify your desk’s top thickness. If your table is exceptionally thick or thin, the grip rings or side ridges of the grommet might not hold securely, causing the entire unit to wobble or pull out when you adjust your computer cables.
Decorative and Utility Covers: For Hiding Flaws or Unused Openings
Sometimes, holes are not part of the furniture’s original design but are the result of wear, mistakes, or shifting needs. You might have stripped screw holes from a loose hinge, accidental drill slips during a DIY project, or a cable hole that is no longer needed because you switched to a wireless setup. Decorative and utility covers help salvage these surfaces.
For small flaws and minor surface damage, a physical cover might not always be the cleanest option. If the hole is very shallow, using a high-quality wood filler combined with matching touch-up markers is often the most discreet route. However, if the damage is deeper, using an oversized adhesive decorative cap can quickly hide the blemish without requiring extensive sanding.
For large, obsolete openings, you have several practical options:
- Blank Grommets: These feature a solid plastic or metal center with no opening, making them perfect for sealing off an unused 60mm desk hole and restoring a flat writing surface.
- Wooden Plugs: These solid wood inserts can be tapped into place with a small amount of wood glue, then sanded flush and stained to match the surrounding wood.
- Custom-Cut Veneer Patches: Ideal for flat, laminated surfaces, these patches can be carefully aligned over the hole to mimic the original grain.
Before applying any adhesive cover, clean the furniture surface thoroughly with a dry or slightly damp microfibre cloth to remove dust, oils, and fingerprints. If you are using wooden plugs, avoid using excessive force with a metal hammer. Tapping too hard can easily split or crack surrounding particleboard or MDF, which are highly susceptible to impact damage.
How to Measure and Install Your Chosen Hole Cover
Achieving a professional finish requires precise preparation. To get a perfect fit, skip the guesswork and gather the right tools. Use digital calipers for small screw holes to get an accurate reading down to the millimeter, and use a standard measuring tape or steel ruler for larger cable cutouts.
To measure correctly, always measure the inner diameter of the hole at its widest point. For depth, insert a toothpick or a depth gauge into the hole, mark the level where it sits flush with the surface, and measure that length. This step ensures your push-in plug won’t bottom out and protrude awkwardly above the surface.
Follow these steps for a clean installation:
For Push-In Caps
- Align the cap straight over the hole to prevent cross-threading or bending the plastic ribs.
- Press down firmly with your thumb.
- If the fit is tight, place a soft block of wood or thick cardboard over the cap and tap gently with a rubber mallet. Avoid using metal hammers directly on plastic caps, as they can easily crack the hardware or dent the surrounding wood.
For Adhesive Covers
- Clean the area thoroughly and let it dry completely.
- Peel the backing off the sticker, taking care not to touch the adhesive surface with your fingers.
- Align the cover carefully from one edge to avoid trapping air bubbles.
- Press down firmly for 10 to 15 seconds. Avoid repositioning the cover, as peeling it off weakens the adhesive bond permanently.
If you find that the hole is slightly stripped or enlarged, a standard plug might slip out. You can resolve this easily. Wrap a tiny piece of Teflon tape around the plug’s shank to increase its thickness, or apply a tiny drop of PVA wood glue to the edges of the plug before inserting it to hold it securely in place.
Frequently Asked Questions (FAQ)
Can I use a screw hole cap to cover a large cable management hole?
No, screw hole caps are designed for small diameters (typically up to 15mm) and lack the structural lip or depth required to sit securely over a large 60mm or 80mm cutout. Attempting to use one will result in the cap falling through. Instead, use a blank cable grommet or a solid wood plug designed specifically for large utility holes.
How do I remove a stuck or glued-on hole cover without damaging the furniture finish?
To remove a stubborn cover, gently slide a thin plastic spudger or an old credit card under the edge to lift it. If it is held by strong adhesive, apply mild heat with a hairdryer on a low setting for 10–15 seconds to soften the glue. Once removed, wipe away any remaining residue with a gentle, furniture-safe solvent or a mild soap solution, checking your furniture’s care label first to prevent finish damage.
Community discussion
Share your experience or ask a question. Comments are reviewed before publication.