
To fit a compact Singapore HDB service yard, a foldable wall-mounted broom rack should ideally feature a slim folded profile of under 5 cm to 8 cm in depth, a total width that matches your clear wall space (typically 30 cm to 50 cm), and individual hook spacing of at least 10 cm to 12 cm to prevent overlapping tool heads. Because HDB service yards are highly compact zones shared with washing machines, automated laundry racks, and utility pipes, selecting the right dimensions requires balancing the rack’s fully deployed footprint with the clearance needed for daily household traffic. Measuring your specific tools and wall space before purchasing ensures that your cleaning equipment remains organized and accessible without obstructing walkways or colliding with appliances.
Assessing Your Service Yard Space and Clearance Needs
HDB service yards are notoriously tight spaces where every centimeter counts. Before purchasing a broom rack, you must map out the exact wall area available for mounting. Start by measuring the usable width and height of your target wall, taking careful note of permanent fixtures. In Singapore flats, service yards are often crisscrossed with exposed copper water pipes, electrical conduits, gas meters, and window frames. Your chosen mounting zone must leave a buffer of at least 5 cm around these fixtures to allow for safe installation and to prevent the rack or hanging tools from knocking against them.
Next, consider the physical clearance required for the walkway. A standard service yard walkway needs to remain unobstructed so you can carry laundry baskets or access appliances comfortably. Measure the width of the corridor and compare it to the rack’s depth when fully deployed (with brooms inserted) versus when it is folded flat against the wall. Ideally, the folded rack should not protrude more than a few centimeters into the walking path. If the space is exceptionally narrow, a folding mechanism that tucks the holding clips parallel to the wall when empty is highly beneficial.
Products mentioned in this guide
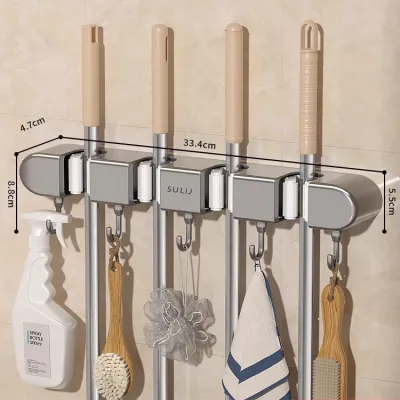

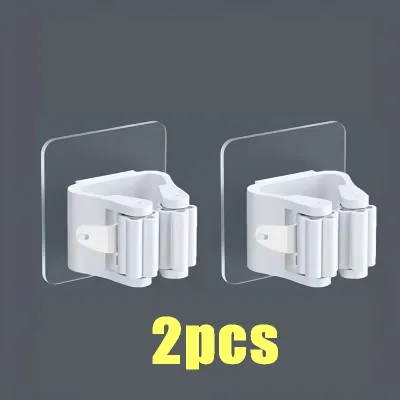

Prices are valid at publication and may change. Please refer to the product page for the latest price.
Finally, analyze the operational swing zones of nearby appliances and fixtures. Open your washing machine door completely to ensure it will not strike the hanging brooms. If you have a ceiling-mounted automated laundry drying rack, lower it to its lowest point to verify that hanging clothes will not drape over your wet mops or block access to the broom rack. Similarly, check the clearance around utility sinks or bifold doors that lead into the kitchen, ensuring that no daily activity is compromised by the presence of the storage unit.
Choosing the Right Folded Profile and Hook Spacing
The physical dimensions of the broom rack itself dictate how well it integrates into a high-traffic utility zone. The folded profile—the distance the rack projects from the wall when no tools are mounted or when the hooks are folded up—is a critical specification. For tight corridors, look for an ultra-slim profile. A rack that folds down to a depth of less than 5 cm when not in use minimizes the risk of catching your sleeves or laundry baskets as you move through the yard.

Equally important is the horizontal spacing between the individual hooks or tension grips. If the grips are positioned too close together, the wider heads of your brooms, squeegees, and dustpans will overlap. This overlap forces the tools to hang at awkward angles, increasing the overall depth of the installation and causing them to tangle when you try to retrieve a single item. To prevent this, verify that the center-to-center distance between each grip is at least 10 cm to 12 cm. This spacing provides adequate clearance for standard broom heads and mop plates to hang side-by-side cleanly.
Additionally, you must check the manufacturer’s specifications for the maximum handle diameter the grips can accommodate. Standard household cleaning tools typically have handle diameters ranging from 1.5 cm to 3 cm. Choosing a rack with adjustable rubberized tension rollers or spring-loaded clamps ensures a secure hold on various handle thicknesses, preventing heavier wet mops from slipping down to the floor.
Single-Tier vs. Multi-Tier Folding Designs
When selecting a configuration, you will generally choose between single-tier and multi-tier folding designs, each offering distinct spatial trade-offs. A single-tier rack features a single horizontal bar of hooks and grips. This design is highly suited for low-clearance walls or areas directly above low-profile appliances. It works exceptionally well for hanging short-handled items like hand brushes, dustpans, and microfiber cloths, keeping them within arm’s reach without consuming valuable vertical wall space.
In contrast, multi-tier folding designs stack multiple rows of hooks vertically or combine a top shelf with lower hanging pegs. This configuration maximizes vertical storage, making it an excellent choice if your horizontal wall space is extremely limited. However, multi-tier units require careful planning regarding bottom clearance. You must ensure that long-handled items, such as spray mops or floor squeegees hanging from the top tier, have enough vertical space to hang freely without hitting the floor or obstructing the lower tier’s storage capacity.
Furthermore, multi-tier units carry a heavier cumulative load and require robust structural stability. Because you are storing more items on a single footprint, the downward pull on the wall anchors is significantly higher. Before opting for a multi-tier design, verify that your wall substrate can support the combined weight of the rack and all intended tools, and ensure the unit features multiple secure mounting points to distribute the load evenly.
Verifying Wall Compatibility and Installation Safety
A secure installation is paramount to prevent the broom rack from pulling away from the wall under the weight of your cleaning gear. First, identify the substrate of your service yard wall. In Singapore HDB flats, these walls are typically constructed of solid concrete, precast panels, or finished with ceramic tiles. Drywall partitions are less common in service yards but may exist in modified layouts. You must match the mounting hardware to this specific substrate; standard plastic wall plugs designed for concrete will not hold securely in drywall, and specialized tile drill bits are required to penetrate tiled surfaces without cracking them.
While adhesive-mounted racks are popular for their tool-free installation, they have distinct limitations. High-strength adhesive tapes and glues require a perfectly smooth, non-porous, and clean surface, such as glazed ceramic tiles or smooth glass. They perform poorly on textured tiles, matte finishes, painted concrete, or porous plaster walls. Furthermore, the high humidity levels common in semi-open HDB service yards can degrade adhesive bonds over time. For long-term safety and reliability, mechanical drilling with appropriate screws and wall anchors remains the most stable option, especially for racks holding heavier wet mops.
Before mounting, cross-reference the rack’s rated load capacity—typically found on the product packaging—with the actual weight of your tools. Remember that a wet microfiber mop or a saturated sponge mop can weigh twice as much as it does when dry. Ensure your calculations account for this wet weight to avoid overloading the system. Finally, always prioritize safety during installation. If you suspect that electrical conduits or water pipes are concealed behind your chosen drilling zone, stop immediately and consult a qualified professional or use a digital wall scanner to map out safe drilling paths.
Common Sizing and Placement Mistakes to Avoid
Avoiding common installation pitfalls will save you from damaged walls and frustrating daily use. One frequent mistake is mounting the broom rack too low on the wall. When mops and brooms are hung too close to the ground, their heads or microfiber pads drag on the floor. In a service yard, this exposes the cleaning tools to pooling water from washing machine drainage, causing them to remain damp, develop unpleasant odors, and collect dust. Aim to mount the rack high enough so that the longest tool hangs at least 15 cm to 20 cm clear of the floor.
Another oversight is ignoring the swing radius of the folding mechanism. Foldable racks are designed to pivot or collapse when not in use, but they require clearance to perform this action. If you install the rack too close to an adjacent wall corner, window frame, or bifold door, the folding arms or the handles of the tools themselves may strike these obstacles during deployment. Always test the full range of motion of the folding joints before marking your drill holes.
Lastly, avoid the temptation to overload the rack beyond its tested capacity. It can be tempting to hang multiple heavy items, such as steam mops or filled spray bottles, from a single hook or grip. Over time, this concentrated weight exerts constant leverage on the upper wall anchors, gradually loosening them and causing the rack to sag or pull out of the wall entirely. Adhere strictly to the manufacturer’s weight limits for individual hooks and the overall unit.
Frequently Asked Questions (FAQ)
Can I install a foldable broom rack on tiled walls without drilling?
Yes, you can install a foldable broom rack on tiled walls without drilling, provided you use high-quality, moisture-resistant adhesive mounts designed for humid environments. The tile surface must be completely smooth, non-porous, and thoroughly cleaned with rubbing alcohol to remove any soap scum, grease, or dust before application. However, keep in mind that adhesive mounts have lower weight capacities than drilled screws. If you plan to hang heavy wet mops or multiple tools, mechanical drilling is highly recommended to prevent the rack from falling. If you must remove the adhesive rack later, applying heat from a hair dryer can soften the adhesive, allowing you to pry it off gently without cracking the tiles.
How do I measure the handle diameter to ensure a secure grip?
To ensure your cleaning tools fit securely into the rack’s tension grips, you need to measure their handle diameters. The easiest method is to use a sliding caliper for an exact reading. Alternatively, you can wrap a flexible measuring tape or a piece of string around the handle to find its circumference, then divide that number by 3.14 (Pi) to calculate the diameter. Be sure to measure the thickest part of the handle where the grip will clamp, including any rubber sleeves, foam grips, or plastic hanging loops. Compare this measurement against the rack’s specified grip range, which is typically listed on the product packaging as a minimum and maximum diameter.
Community discussion
Share your experience or ask a question. Comments are reviewed before publication.