
Replacing worn anti-slip rubber pads on furniture legs is a straightforward yet essential maintenance task that protects your flooring from unsightly scratches, reduces scraping noises, and restores structural stability to your chairs, tables, and cabinets. Over time, the protective rubber barriers on the bottom of furniture legs degrade due to constant pressure, friction, and environmental exposure. By identifying the signs of wear, safely removing the old pads and adhesive residue, and applying high-quality replacements, you can preserve both your furniture and your floors.
To achieve a long-lasting bond and reliable grip, the replacement process requires careful surface preparation and precise alignment. This is particularly true when dealing with diverse flooring materials—such as delicate wood parquet, luxury vinyl tiles, or polished marble—and varying furniture materials, including solid wood, tubular metal, and molded plastic. Taking a systematic approach ensures that the new pads remain firmly in place under daily use.
When to Replace Worn Anti-Slip Rubber Pads
Recognizing when your furniture pads have reached the end of their functional lifespan is key to preventing irreversible damage to your flooring. Because these accessories are positioned underneath the furniture legs, they are easily overlooked until noticeable wear or floor damage has already occurred. Establishing a routine inspection habit can save you from costly floor refinishing or repair bills.
Products mentioned in this guide
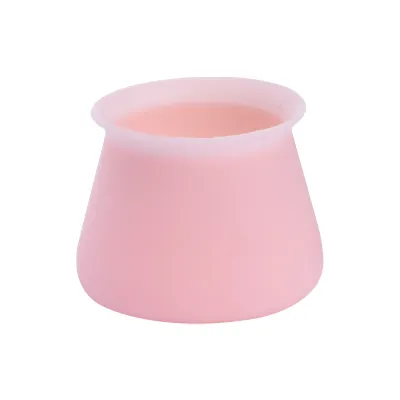
![[SG STOCK] Silicone Chair Furniture Leg Covers for Table Sofa Anti Slip Pad Anti Slip Rubber Floor Protection](https://img.lazcdn.com/g/p/316a15a8a4faf91daaefad6a1db2763a.jpg_400x400q80.jpg_.webp)
Prices are valid at publication and may change. Please refer to the product page for the latest price.
Visual Signs of Wear
To check the state of your furniture pads, safely tilt or invert the furniture to expose the bottom of the legs. Look closely for the following physical indicators of degradation:
- Flattening and Thinning: Over years of supporting heavy loads, the rubber material compresses, losing its cushioning thickness and shock-absorbing properties.
- Cracking and Hardening: Exposure to air, dust, and temperature fluctuations causes natural and synthetic rubber to lose its elasticity, leading to brittle edges and deep cracks.
- Peeling and Misalignment: The adhesive backing can fail, causing the pad to shift sideways, overhang the leg edge, or peel away entirely.
- Tearing or Missing Pieces: High friction from dragging furniture can tear chunks out of the rubber, leaving portions of the hard furniture leg directly exposed to the floor.
- Adhesive Oozing: In warm or humid conditions, low-quality adhesives can melt and squeeze out from under the pad, attracting dirt and leaving sticky residue on your floors.
Functional Warning Signs
Even if you do not visually inspect the legs, your furniture and floors will often signal that a replacement is overdue. Pay close attention to these everyday warning signs:
- Unexpected Sliding: If dining chairs or sofas slide too easily or shift when you sit down, the rubber has lost its high-traction grip.
- Scraping or Screeching Noises: A harsh, high-pitched sound when moving a chair indicates that the soft barrier has worn through, allowing the hard wood or metal leg to grind against the floor.
- New Floor Scuffs and Scratches: Fine scratches on timber parquet, dull patches on polished stone, or dark streaks on vinyl flooring are clear indicators that the protective pad is failing or that grit has become permanently embedded in the worn rubber.
Tools and Materials You Will Need
Before beginning the replacement process, gather the necessary tools and materials. Having everything on hand ensures a smooth, efficient workflow and prevents the adhesive on your new pads from collecting dust while you search for tools.

Essential Replacement Materials
Selecting the correct replacement pad is critical for stability and longevity. You will need:
- New Anti-Slip Rubber Pads: Choose pads that match the exact shape (round, square, or rectangular) and finished dimensions of your furniture legs. Measure the diameter or width of the leg base carefully. A pad that is too large will overhang and peel off quickly, while a pad that is too small reduces the contact area and compromises stability.
- Appropriate Thickness: For heavy furniture like dining tables, sofas, or sideboards, opt for thicker, heavy-duty rubber pads that can withstand high load capacities without flattening immediately.
Preparation and Cleaning Tools
To prepare the surface and remove old materials safely, assemble the following items:
- Plastic Scraper: A plastic putty knife or an old plastic card is essential for scraping away old adhesive without scratching wood finishes, gouging metal, or damaging plastic legs.
- Lint-Free Microfiber Cloths: These are used for wiping away dust, debris, and cleaning solutions without leaving fibers behind.
- Mild Cleaning Agents: Isopropyl alcohol (rubbing alcohol) or warm, soapy water is ideal for degreasing the bottom of the furniture legs.
- Hairdryer: Useful for applying gentle, controlled heat to soften stubborn, hardened adhesives.
Safety and Compatibility Check
Before using any chemical solvents, adhesive removers, or heat sources, always consult the furniture manufacturer’s care instructions and the flooring manufacturer’s guidelines. Certain finishes, varnishes, or plastics can be permanently damaged, discolored, or dissolved by strong solvents or excessive heat. If instructions conflict, or if you are unsure of the material compatibility, stop and consult a professional furniture restorer.
How to Safely Remove Old Rubber Pads and Residue
Removing the old, worn-out pads and cleaning the resulting adhesive residue is the most critical phase of the replacement process. A new pad applied over old glue, dirt, or uneven surfaces will fail prematurely because the adhesive cannot form a complete, flat bond with the furniture leg.
Detaching the Worn Pads
For pads that are already peeling, you can often pull them off manually. However, if the old pads are firmly stuck or have hardened over time, use the following gentle removal technique:
- Apply Gentle Heat: Plug in a hairdryer and set it to a low or medium heat setting. Hold the hairdryer approximately 10 to 15 centimeters away from the furniture leg, directing the warm air at the old rubber pad.
- Keep the Heat Moving: Constantly move the hairdryer back and forth. Do not hold the heat source in one spot, as excessive localized heat can blister wood varnish, melt plastic components, or discolor paint.
- Pry Gently: After 30 to 60 seconds of heating, the adhesive should soften. Insert the edge of your plastic scraper between the rubber pad and the furniture leg, gently prying the pad upward. It should peel away cleanly.
Clearing Adhesive Residue Safely
Once the rubber pad is removed, a sticky, uneven layer of old adhesive often remains on the bottom of the leg. This must be completely cleared:
- Scrape the Bulk Residue: While the residue is still warm from the hairdryer, use your plastic scraper to shave off as much of the softened glue as possible.
- Perform a Solvent Test Patch: Before applying any cleaning agent or mild adhesive remover to the furniture leg, apply a tiny drop to a hidden, inconspicuous area of the furniture (such as the inner side of a leg near the top). Wait a few minutes to ensure it does not soften the finish, strip the paint, or cause discoloration.
- Apply Mild Solvent: Dampen a corner of a microfiber cloth with isopropyl alcohol or a mild, finish-safe adhesive remover. Gently rub the sticky residue on the bottom of the leg in a circular motion. Avoid soaking the wood, as excess moisture can penetrate the grain and cause swelling or joint failure.
- Wipe and Dry: Wipe the area with a clean, damp cloth to remove any remaining chemical residue, then dry it thoroughly with a fresh microfiber towel. Allow the furniture legs to air-dry completely for at least 15 to 30 minutes before moving to the next step.
Step-by-Step Installation of New Anti-Slip Pads
With the furniture legs clean, smooth, and dry, you are ready to install the new anti-slip rubber pads. Proper installation technique ensures maximum surface contact, preventing the pads from shifting or peeling under the shear forces generated when furniture is moved.
Preparing the Furniture Legs
Before peeling the backing off your new pads, perform a final inspection of the leg bases. The surface must be completely free of dust, oils, moisture, and cleaning solvent residues.
In humid environments, such as Singapore’s tropical climate, ambient moisture can settle on surfaces and severely compromise the bonding strength of pressure-sensitive adhesives. Ensure you are working in a well-ventilated, dry indoor area. If the wood feels slightly damp to the touch, allow extra drying time or use a dry cloth to remove any surface condensation immediately before application.
Applying and Securing the New Pads
Follow these steps to ensure a secure, long-lasting bond:
- Handle with Care: Avoid touching the exposed adhesive backing of the new pad with your fingers. Skin oils and dirt transfer easily to the glue, significantly reducing its bonding capacity.
- Align Centrally: Position the pad directly over the center of the furniture leg base. Ensure there is an even margin around the edges and that no part of the pad overhangs the perimeter of the leg.
- Apply Firm, Even Pressure: Once aligned, press the pad firmly onto the bottom of the leg. Use your thumb or the palm of your hand to apply direct, heavy pressure across the entire surface of the pad for at least 30 to 60 seconds. This pressure-sensitive adhesive requires physical force to activate the chemical bond with the substrate.
- Check the Edges: Run your finger around the perimeter of the pad to ensure the edges are fully sealed and flat against the leg surface, leaving no gaps where dust or pet hair could creep in.
Respecting the Curing Time
Do not immediately stand the furniture upright or slide it across the floor. Almost all self-adhesive rubber pads require a specific curing time to reach their maximum bond strength.
Check the manufacturer’s instructions on the product packaging for the recommended curing duration, which is typically 24 hours. Leaving the furniture upside down or tilted during this period prevents lateral shear forces from shifting the pad before the adhesive has fully set. Placing weight on the pads too early can cause the adhesive to slide out of alignment, ruining the installation.
Testing Grip and Maintaining Your New Pads
Once the adhesive has fully cured, you can return your furniture to its normal position. Taking a few moments to test the installation and establishing a simple maintenance routine will extend the lifespan of your new pads and ensure continuous floor protection.
Testing the Installation
Carefully stand the furniture upright on its legs. Perform the following quick checks:
- Stability Check: Gently rock the furniture from side to side. If you notice any new wobbling, double-check that all replacement pads are of uniform thickness and that none are misaligned or double-stacked.
- Grip Test: Give the furniture a gentle push. You should feel firm resistance, and the furniture should not slide easily or smoothly across the floor. There should be zero scraping noises.
Routine Maintenance and Care Tips
To maximize the lifespan of your new anti slip rubber pads and keep your floors in pristine condition, adopt these practical habits:
- Lift, Do Not Drag: Whenever you need to move heavy furniture for cleaning or rearranging, lift the item entirely off the floor instead of dragging it. Dragging subjects the pads to extreme lateral shear forces that can tear the rubber or slide the pad off its adhesive base.
- Periodic Cleaning: Dust, pet hair, and small grit particles naturally accumulate on the bottom of rubber pads over time. This debris can get pressed into the rubber, acting like sandpaper against your floors and reducing traction. Every few months, wipe the bottom of the pads with a slightly damp, lint-free cloth to remove accumulated grime.
- Regular Inspections: Make it a habit to visually inspect the pads twice a year. Catching a peeling or thinning pad early allows you to replace it before it falls off entirely and exposes your floor to scratches.
Frequently Asked Questions (FAQ)
Can I use anti-slip rubber pads on all types of flooring?
While anti-slip rubber pads are highly effective and safe for most hard surfaces like ceramic tiles, marble, and concrete, you should always check your specific flooring manufacturer’s care guidelines.
Certain sensitive flooring materials, such as specific light-colored luxury vinyl tiles (LVT) or raw, untreated hardwoods, can react chemically with certain rubber compounds. This reaction, known as plasticizer migration, can leave permanent dark yellow or brown stains on the floor surface over time. For these sensitive surfaces, manufacturers often recommend non-staining rubber, specialized felt pads, or silicone-based protectors instead.
How often should I replace the rubber pads on my furniture?
There is no fixed timeline for replacing furniture pads, as wear rates depend heavily on several variables. These include the weight of the furniture, how frequently the item is moved (such as dining chairs versus a heavy sideboard), the texture of your flooring, and environmental factors like humidity.
Instead of adhering to a strict calendar schedule, rely on regular visual and functional inspections. For frequently used dining chairs, you may need to replace the pads every 12 to 18 months, whereas stationary heavy furniture like wardrobes or bookshelves may only require replacement once every few years or when you decide to rearrange the room.

Community discussion
Share your experience or ask a question. Comments are reviewed before publication.