
Finding the perfect replacement knob handle for your home furniture requires precise measurements of the existing hardware footprint, screw hole spacing, projection depth, and panel thickness. Getting these dimensions right ensures your new hardware fits seamlessly into the existing holes without requiring messy drilling or leaving unsightly marks on your drawer fronts. Whether you are updating a vintage chest of drawers, refreshing kitchen cabinets, or upgrading a wardrobe, taking a few minutes to measure systematically prevents alignment issues and ensures a comfortable grip. By understanding how to measure each dimension accurately, you can confidently browse online marketplaces or local hardware shops to find a style that matches both your aesthetic preferences and the physical requirements of your furniture.
Tools and Preparation for Measuring Furniture Hardware
Before you begin measuring, gathering the correct tools is essential for achieving an accurate fit. A standard metal tape measure is useful for general dimensions, but a pair of digital calipers provides the sub-millimeter precision needed for hardware threads and hole diameters. You will also need a manual screwdriver that matches your existing screws to safely remove the hardware without stripping the heads. Avoid power drills, which can easily slip and gouge the wood surface.
Avoid using flexible sewing tapes or plastic rulers with worn, rounded edges. Flexible tapes can stretch over time, and worn rulers often lack clear markings at the crucial zero-point, leading to errors of one or two millimeters. These tiny discrepancies can prevent a new handle from aligning with pre-drilled holes.
Products mentioned in this guide
![[SG STOCK] VINOGA Gold Furniture Cupboard Handle Brass Cabinet Handle Solid Golden Drawer Pulls Kitchen Cupboard Hardware|Furniture Knobs and T Bar Handle](https://img.lazcdn.com/g/p/53624969c185093ef1c0ba2a6159d2ed.jpg_400x400q80.jpg_.webp)
![[SG STOCK] VINOGA Brass Cabinet Handle and Knobs Furniture Pulls Wardrobe Kitchen Cabinet Handles and Knobs Cabinet Cupboard Hardware|Furniture Knobs and Handle](https://img.lazcdn.com/g/p/561ce2d1a96a1d9a4518e6873182370b.jpg_400x400q80.jpg_.webp)
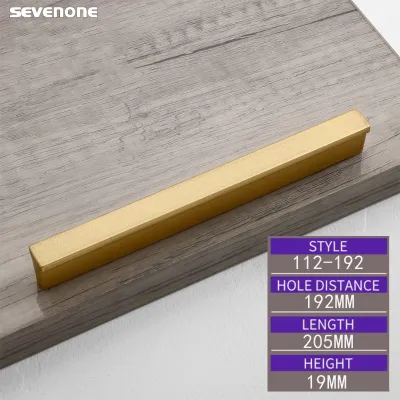
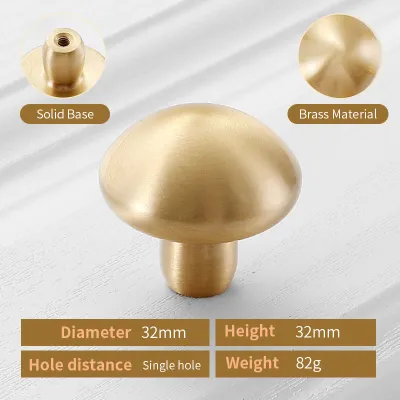
![[SG Seller]Stainless Steel Kitchen Handle Cupboard Drawe Door Cabinet T Bar Handle Pull Knob cabinet knobs](https://img.lazcdn.com/g/p/fd2576fe5abeef53e168a0d34e3e578d.jpg_400x400q80.jpg_.webp)
![[SG Seller]Stainless Steel Pull Knob cabinet knobs Kitchen Handle Cupboard Drawe Door Cabinet T Bar Hand](https://img.lazcdn.com/g/p/8985960b791762875dfe0580ea78f2d2.jpg_400x400q80.jpg_.webp)
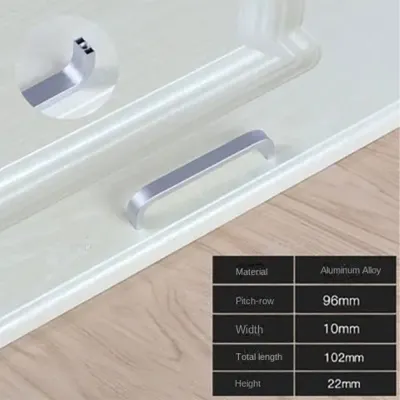
![[OKLIFE. SG]Invisible Flat-Mounted Gusset Furniture Hardware Aluminum Alloy Handle Concealed Buckle Drawer Knob Cabinet Handle](https://img.lazcdn.com/g/p/b4417e9f8348b024038993823ca8b254.jpg_400x400q80.jpg_.webp)
Prices are valid at publication and may change. Please refer to the product page for the latest price.
To prepare your furniture, open the drawer or door fully to ensure you have unobstructed access to both the front and back of the panel. Carefully unscrew the existing knob handle while holding it securely from the front to prevent it from dropping and scratching the finish. Wipe down the area surrounding the mounting hole to remove any accumulated dust, grease, or wax, giving you a clean surface for precise measurements.
Step-by-Step Guide to Measuring the Existing Knob Handle
Replacing furniture hardware involves matching several key physical dimensions to ensure both functional compatibility and visual balance. The most critical measurements include the center-to-center hole spacing, the overall length and width of the hardware, the projection depth, and the base diameter. Understanding these dimensions prevents buying a knob that is too small or too deep.

While a standard knob handle typically utilizes a single mounting hole, some modern designs or larger pull-style knobs require two mounting points. If you are replacing a single-hole knob with another single-hole knob, your primary focus will be the base diameter and screw size. However, if you are transitioning between different styles, understanding hole spacing becomes the foundation of your search.
Always record your measurements in millimeters rather than inches. Most replacement hardware manufacturers specify dimensions in metric units, and converting fractional inches can introduce rounding errors that compromise the fit.
Measuring Screw Hole Spacing and Base Diameter
For hardware that utilizes more than one screw, you must determine the exact center-to-center distance between the mounting holes.
- Identify the Center Point: Do not measure from the outer edges of the holes. Instead, place your measuring tool at the exact center of the first hole and measure directly to the exact center of the second hole.
- Standard Spacing Check: Common industry standards for small pulls or double-mounting knobs often use fixed intervals such as 32mm, 64mm, or 96mm. If your measurement is very close to one of these standard sizes, it is highly likely the industry standard is the correct match.
- Base Diameter Measurement: The base is the portion of the knob handle that sits flush against the wood surface. Measure the widest part of this footprint. A larger base diameter is highly beneficial if the old hardware left an indentation, a faded ring, or chipped paint on the cabinet face, as the new base will neatly conceal these imperfections.
- Single-Hole Hardware: If your cabinet uses a classic single-hole knob, measure the diameter of the existing hole itself. This ensures the replacement screw thread will pass through smoothly without being too loose or requiring you to enlarge the hole with a drill.
- Footprint Verification: Take note of any decorative backplates. If your current knob has an integrated backplate, you must measure its total height and width to ensure the replacement hardware either covers the same area or that you are prepared to refinish the exposed wood underneath.
Measuring Projection Depth and Overall Dimensions
Projection depth and overall dimensions dictate how the hardware functions in daily use and how it looks on your furniture.
- Projection Depth: This is the distance the knob handle extends outward from the flat surface of the drawer or door. To measure this, place your ruler flat against the cabinet face and measure to the furthest outward point of the knob.
- Grip Clearance: A knob with insufficient projection leaves very little space for your fingers, making drawers difficult to pull open, especially if they are heavy or on non-lubricated wooden runners. Ensure the replacement offers enough clearance for comfortable daily use.
- Overall Width and Height: Measure the maximum face dimensions of the knob from edge to edge. A knob that is too small can look lost on a large wardrobe door, while an oversized knob can overwhelm a delicate bedside table drawer.
- Proportional Balance: Compare the overall width of the knob to the total width of the drawer front. Keep the hardware width proportional to the drawer's overall face.
- Shape Considerations: Round knobs are highly forgiving if they rotate slightly over time, whereas square, rectangular, or T-bar knobs must be perfectly aligned. If choosing a geometric shape, ensure the base has a small positioning pin or that you can tighten it sufficiently to prevent spinning.
Checking Furniture Clearance and Door or Drawer Dimensions
Measuring the hardware itself is only half the process; you must also evaluate the physical environment of the furniture piece. Start by measuring the distance from the center of the mounting hole to the top, bottom, and side edges of the drawer front or door frame. This ensures that a larger replacement knob will not overhang the edges of the panel or look misaligned.
In compact living environments, such as apartments or modern flats where space is optimized, projection clearance is highly critical. Open adjacent doors and drawers fully to check if a deeper knob handle will collide with nearby walls, household appliances, or other furniture pieces. A knob that projects too far can prevent a corner cabinet door from opening to its full angle, limiting your access to the interior shelves.
Additionally, measure the exact thickness of the furniture panel where the knob will be mounted. Insert your measuring tool or calipers into the open hole to read the depth of the wood. Standard cabinet doors are often around 16mm to 20mm thick, but heavy drawer fronts or decorative faceplates can be significantly thicker. Knowing this dimension is vital because it determines the exact length of the mounting screw you will need.
In regions with high humidity, such as Singapore, wood can swell or warp slightly over time. This makes it vital to measure the panel thickness at the exact mounting spot rather than relying on general specifications. A swollen panel might require a slightly longer screw than standard to ensure a secure, long-lasting grip.
Verifying Measurements and Selecting the Right Replacement
Once you have recorded all your dimensions, cross-reference them carefully with the technical specifications provided by the hardware manufacturer or retailer. Most reputable suppliers provide detailed line drawings showing the exact millimeter measurements of the base, projection, and screw threads. Do not rely solely on product photos, as perspective can make hardware appear larger or smaller than it is.
If you encounter minor discrepancies between your measurements and the product specifications, evaluate whether they will impact installation. For a single-hole knob, a difference of one millimeter in the base diameter is purely cosmetic and will not affect mounting. However, even a half-millimeter discrepancy in center-to-center hole spacing on a two-screw handle can make installation impossible without forcing the screws and potentially stripping the threads.
Always verify the screw thread type and length included with your replacement knob. Most standard hardware uses metric M4 screws, but some vintage or regional pieces may use different thread standards. If your furniture panel is exceptionally thick, you may need to purchase longer screws separately from a local hardware store to ensure they penetrate deep enough into the knob base to secure it firmly without stripping.
If replacing multiple knobs, buy them in a single batch to ensure color consistency across production runs.
Troubleshooting Common Measurement Mistakes
One of the most frequent errors when sourcing replacement hardware is measuring the overall length of an existing handle instead of the center-to-center hole spacing. The overall length includes decorative extensions, which are wider than the actual screw holes, leading to alignment errors.
Another common mistake is measuring from the outer edge of one screw hole to the inner edge of the next. This off-center measurement skew can easily throw your calculations off by several millimeters. Always measure from the dead center of each hole to maintain geometric accuracy.
If you remove your old hardware and find that the existing screw holes are stripped, enlarged, or slightly misaligned due to years of use or wood movement in humid climates, do not attempt to force the new screws. Forcing screws into damaged holes can split the wood panel. Instead, consider filling the damaged holes with a high-quality wood filler or dowel, sanding the surface flush, and redrilling clean, precise holes. If the furniture piece is a valuable antique or requires complex structural repairs, consulting a professional furniture restorer is the safest path to preserve the integrity of the piece.
Additionally, avoid assuming that all drawers on a single piece of furniture use the exact same hardware size. Manufacturers sometimes use larger handles on deep bottom drawers and smaller knobs on top drawers. Measure each unique drawer style individually to avoid ordering the wrong quantities or sizes.
Frequently Asked Questions (FAQ)
Can I replace a two-screw pull handle with a single-screw knob handle?
Yes, you can replace a two-screw pull handle with a single-screw knob handle, but you must address the remaining exposed hole. One practical solution is to select a replacement knob handle that features a wide, elongated backplate or an integrated escutcheon plate designed to cover both original holes. Alternatively, you can fill the unused hole with matching wood putty, sand it smooth, and touch up the paint or stain to blend with the rest of the drawer front. If you choose to fill the holes, ensure the filler is completely cured before drilling the new single hole in the center.
What should I do if my new knob handle screws are too long or too short?
If the screws provided with your new knob handle are slightly too long, you can add small metal washers or spacers on the inside of the drawer panel to take up the slack and ensure a tight fit. If the screws are too short and do not reach the threads of the knob, measure your panel thickness and visit a local hardware store to purchase longer screws of the same thread type, typically M4. Avoid over-tightening short screws, as this can strip the internal threads of your new knob. For highly customized furniture, you can also look for snap-off screws, which feature pre-cut segments that can be easily shortened with pliers to match your exact panel thickness.
Community discussion
Share your experience or ask a question. Comments are reviewed before publication.