
Replacing a worn or outdated furniture knob handle is one of the simplest ways to refresh your home’s interior, but achieving a perfect fit requires precise measurement and careful installation. To replace a knob handle correctly, you must determine whether you have a single-hole or multi-hole setup, measure the exact center-to-center distance of any existing holes, and verify both the screw length and thread size against your cabinet door or drawer front thickness. Taking these steps before purchasing new hardware prevents alignment errors, unsightly gaps, and unnecessary drilling.
Tools and Materials Needed for Knob Handle Replacement
Before starting your project, gather the necessary tools to ensure a smooth, damage-free installation. Having the correct items on hand prevents interruptions and protects your furniture’s finish.
- Screwdrivers: A standard Phillips head and a flathead screwdriver are essential. Choose manual screwdrivers over power drills for tightening to avoid stripping threads or cracking delicate wood.
- Measuring Instruments: A reliable metal tape measure is useful, but a pair of digital calipers provides the sub-millimeter accuracy needed for precise thread and hole measurements.
- Surface Protection: Masking tape or painter's tape is invaluable for marking drill lines and protecting the cabinet face from accidental scratches.
- Catchment Cloth: Place a soft microfiber cloth inside the drawer or cabinet base to catch falling screws and protect the interior surfaces.
- Optional Restoration Supplies: Keep wood filler, fine-grit sandpaper, and matching touch-up paint or varnish nearby in case you need to repair old holes or worn finishes.
How to Measure Your Existing Knob Handle Accurately
Accurate measurements are the foundation of a successful hardware upgrade. Even a tiny discrepancy of one or two millimeters can prevent a new handle from fitting into existing holes, forcing you to drill new ones or return the hardware.
Products mentioned in this guide
![[SG STOCK] VINOGA Gold Furniture Cupboard Handle Brass Cabinet Handle Solid Golden Drawer Pulls Kitchen Cupboard Hardware|Furniture Knobs and T Bar Handle](https://img.lazcdn.com/g/p/53624969c185093ef1c0ba2a6159d2ed.jpg_400x400q80.jpg_.webp)
![[SG STOCK] VINOGA Brass Cabinet Handle and Knobs Furniture Pulls Wardrobe Kitchen Cabinet Handles and Knobs Cabinet Cupboard Hardware|Furniture Knobs and Handle](https://img.lazcdn.com/g/p/561ce2d1a96a1d9a4518e6873182370b.jpg_400x400q80.jpg_.webp)
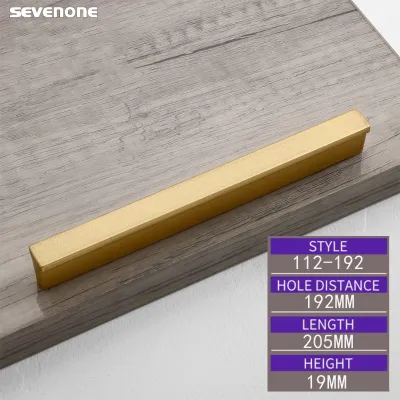
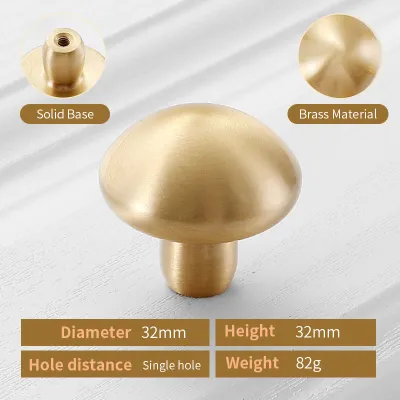
![[SG Seller]Stainless Steel Kitchen Handle Cupboard Drawe Door Cabinet T Bar Handle Pull Knob cabinet knobs](https://img.lazcdn.com/g/p/fd2576fe5abeef53e168a0d34e3e578d.jpg_400x400q80.jpg_.webp)
![[SG Seller]Stainless Steel Pull Knob cabinet knobs Kitchen Handle Cupboard Drawe Door Cabinet T Bar Hand](https://img.lazcdn.com/g/p/8985960b791762875dfe0580ea78f2d2.jpg_400x400q80.jpg_.webp)
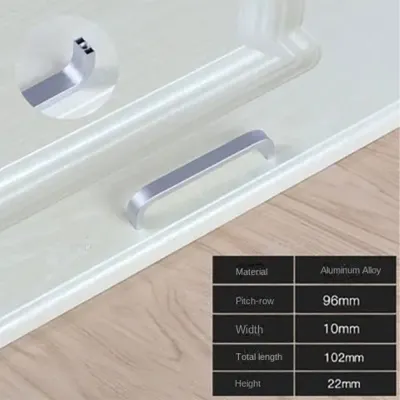
![[OKLIFE. SG]Invisible Flat-Mounted Gusset Furniture Hardware Aluminum Alloy Handle Concealed Buckle Drawer Knob Cabinet Handle](https://img.lazcdn.com/g/p/b4417e9f8348b024038993823ca8b254.jpg_400x400q80.jpg_.webp)
Prices are valid at publication and may change. Please refer to the product page for the latest price.

First, identify whether your furniture uses single-hole knobs or multi-hole pull handles. Single-hole knobs rely on a single screw passing through the wood, making them highly versatile and easy to replace. Multi-hole pull handles require two or more screws spaced at precise intervals, which demands exact center-to-center measurements.
Always measure your hardware before purchasing replacements, and ideally, take measurements both before and after removing the old hardware. Measuring while the hardware is installed gives you a sense of scale and alignment, while measuring after removal allows you to inspect the actual drill holes and the wood’s condition.
When shopping on online marketplaces or at local hardware stores in Singapore, you will encounter both metric (millimeters) and imperial (inches) measurements. Record your dimensions in both systems to ensure compatibility with international hardware standards.
Measuring Hole Centers and Base Diameter
For multi-hole pull handles, the most critical dimension is the center-to-center distance, often abbreviated as C-to-C. This is the exact distance from the center of one screw hole to the center of the next. To measure this accurately, remove the existing handle and measure from the center of one open hole to the center of the other. Common standard distances include 96mm, 128mm, and 160mm, though older or custom furniture may feature unique spacing.
If you are replacing a single-hole knob, you must measure the base diameter of the existing knob. The base is the part of the knob that sits flush against the wood surface. Over time, pressure and environmental factors like Singapore’s high humidity can cause the wood finish beneath the knob to compress, discolor, or wear away. Choosing a replacement knob with a base diameter equal to or larger than the original ensures these cosmetic imperfections remain completely hidden.
Finally, check the diameter of the existing drill hole itself. Most standard cabinet hardware screws require a hole diameter of 4mm or 5mm (approximately 3/16 inch). Insert a drill bit or use your calipers to verify that the new hardware’s mounting post or screw will slide through the hole smoothly without requiring force, which could splinter the surrounding wood.
Checking Screw Length and Thread Size
A common pitfall in hardware replacement is using screws that are either too long or too short for your cabinet doors or drawer fronts. To prevent this, measure the total length of the original screw from the flat underside of the screw head to the very tip of the threaded end. Do not include the screw head itself in this measurement unless you are using flat-head countersunk screws.
Next, measure the exact thickness of your cabinet door or drawer front. Keep in mind that drawer fronts are often constructed with a double layer of wood—the drawer box front and the decorative outer face panel. Your screw must be long enough to pass through both layers, plus any washers, and still penetrate deep enough into the knob’s threaded insert to secure it firmly. Generally, the screw should extend approximately 5mm to 6mm beyond the back of the wood panel.
You must also identify the thread size of your existing screws. Most modern furniture hardware uses metric threads, with M4 (4mm diameter) being the industry standard. However, some older pieces or imported American furniture may use imperial threads, such as 8-32 (number 8 screw size with 32 threads per inch). Trying to force an M4 screw into an 8-32 threaded knob will permanently strip the threads, rendering the hardware useless. Compare your old screw’s threads directly with the new hardware’s specifications before assembly.
Choosing the Right Replacement Knob Handle
Selecting the perfect replacement knob handle involves balancing physical compatibility with aesthetic and functional preferences. Your primary goal is to find hardware that fits your existing cabinet preparation perfectly, minimizing the need for structural modifications.
If you are replacing multi-hole pull handles, prioritize finding replacements that match your measured center-to-center distance exactly. If you cannot find an exact match, you may need to select single-hole knobs instead. Using single-hole knobs allows you to utilize one of the existing holes while filling and painting the second hole, avoiding the complex task of drilling perfectly aligned new holes.
Consider the visual scale and ergonomic clearance of the new hardware. A knob that is too small can look lost on a large wardrobe door, while an oversized handle can overwhelm a delicate bedside drawer. Furthermore, ensure there is adequate finger clearance—the space between the underside of the knob and the cabinet face. In Singapore’s warm climate, sticky fingers or humid hands require a comfortable grip; a clearance of at least 20mm to 25mm allows fingers to slip behind the knob easily without scraping against the wood.
Always review the product specifications on the online marketplace or packaging to see what screw lengths are included. Many manufacturers supply standard 25mm screws, which work well for typical 18mm cabinet doors but are often too short for double-fronted drawers. If the included screws do not match your measured requirements, plan to purchase separate M4 or 8-32 screws of the correct length from a local hardware specialist.
Step-by-Step Guide to Removing and Installing the Knob
Once you have selected and verified your new hardware, you can proceed with the physical replacement. Following a structured, careful process prevents damage to your furniture’s finish and ensures the new knobs are installed straight and secure.
Safely Removing the Old Hardware
Begin by opening the cabinet door or drawer fully to access the mounting screw on the inside. To prevent the hardware from spinning and scratching the outer face of the wood, firmly hold the knob or pull handle with one hand on the outside while using your screwdriver to loosen the screw from the inside. Turn the screwdriver counterclockwise until the screw is completely disengaged.
If you encounter a screw that is stuck, rusted, or sealed in place by layers of paint or varnish, do not force it, as this can strip the screw head. Instead, carefully score around the base of the knob and the screw head with a utility knife to break the paint seal. If the screw head is stripped, use a pair of locking pliers on the back of the screw or a specialized screw extractor tool to gently back it out.
Once the old hardware is removed, clean the exposed wood surface thoroughly. Use a soft cloth dampened with a mild soapy water solution to remove accumulated dust, grease, and oils. Inspect the wood around the drill hole for any hidden damage, such as hairline cracks or splintering, which should be stabilized with a small amount of wood glue before installing the new hardware.
Installing the New Knob Handle
To install the new knob, insert the mounting screw from the back of the cabinet door or drawer front, pushing it through the pre-drilled hole until the threaded end emerges on the front side. Align the new knob handle with the screw tip and begin threading it by hand. Turning the knob clockwise onto the screw for the first few turns helps prevent cross-threading, which can ruin the delicate brass or aluminum threads inside the knob.
If you are installing multiple knobs across a series of drawers or cabinets, consistency is key to a professional look. Use a plastic cabinet hardware template or a custom cardboard jig to verify that each knob sits at the exact same height and distance from the edges. Even a minor misalignment of a few millimeters will be highly visible when viewing the furniture as a whole.
Once the knob is threaded hand-tight, use a manual screwdriver to tighten the screw from the back. Apply gentle, steady pressure until the base of the knob sits flush against the front surface without any wobble. Avoid over-tightening, as excessive torque can crack ceramic or glass knobs, strip the internal metal threads, or crush and splinter the wood fibers of the cabinet door.
Troubleshooting Common Installation Issues
Even with careful planning, you may encounter minor complications during the installation process. Knowing how to resolve these issues safely keeps your project on track without damaging your furniture.
- Screws That Are Too Long: If the screw bottoms out inside the knob before the base is flush against the wood, the screw is too long. You can resolve this by adding one or more small brass or steel flat washers under the screw head on the inside of the drawer to take up the slack. Alternatively, use a pair of wire cutters or a hacksaw to carefully cut the screw to the correct length, ensuring you file the cut tip smooth to prevent thread damage.
- Screws That Are Too Short: If the screw does not reach the threaded insert of the knob, it is too short. Avoid trying to force it, which can strip the first few threads. Instead, match the thread pitch and purchase a replacement screw that is 5mm to 10mm longer.
- Knobs That Spin Freely: If the knob continues to spin even when the screw is fully tightened, the internal threads of the knob may be stripped, or the screw may be slightly too long. First, try adding a washer to see if it tightens. If the internal threads are stripped, you can apply a drop of thread-locking compound or a small piece of plumber's Teflon tape to the screw threads before inserting it to help grip the damaged metal.
- Misaligned or Exposed Holes: If you are switching from a pull handle to a single knob and have an exposed second hole, fill the unused hole with a high-quality wood filler that matches your furniture's color. Allow it to dry completely, sand it flush with fine-grit sandpaper, and apply a matching touch-up paint or wood stain to blend the repair into the surrounding finish.
Frequently Asked Questions (FAQ)
Can I replace a pull handle with a single knob handle?
Yes, you can replace a two-hole pull handle with a single-hole knob handle, but it requires addressing the remaining exposed hole. To maintain a clean, professional appearance, you must fill the unused hole with wood putty or epoxy wood filler, sand it smooth once cured, and carefully touch up the paint or stain to match the rest of the drawer front. For visual balance, the new single knob should ideally be positioned in the exact center of the drawer front. If the original holes were drilled symmetrically around the center, you can use one of the existing holes for the new knob, though this may offset the handle slightly; filling both old holes and drilling a new, perfectly centered hole is often the best approach for symmetry.
How do I prevent the wood from splitting when tightening the screw?
To protect your furniture from structural damage, always avoid over-tightening the mounting screws, especially on engineered woods like particleboard or medium-density fiberboard (MDF), which are highly prone to splitting and stripping. Use a flat metal washer on the inside of the drawer or cabinet door to distribute the screw head’s pressure evenly across a wider surface area. When tightening, turn the screwdriver slowly and stop immediately as soon as you feel a sharp increase in resistance. The knob should be snug enough that it does not wobble or rotate during daily use, but it does not need to be cranked down with excessive force.
What should I do if the new knob covers only part of the old faded finish?
If your new knob leaves a visible ring of faded paint, worn varnish, or accumulated grime from the old hardware, you have a few aesthetic solutions. The simplest option is to select a replacement knob with a larger base diameter or a decorative backplate (also known as a rosette) that completely covers the discolored area. If you prefer a smaller knob, you will need to restore the surface. Gently clean the area with a mild adhesive remover or fine steel wool, then apply a matching wood stain, wax, or touch-up paint. For a flawless, uniform appearance on highly visible pieces, consider sanding down the entire drawer front and applying a fresh coat of finish.
Community discussion
Share your experience or ask a question. Comments are reviewed before publication.