
When an office chair’s armrest cracks, loses its cushioning, or breaks entirely, it can make long working hours incredibly uncomfortable and disrupt your ergonomic posture. Fortunately, you can easily resolve this issue without replacing the entire chair by measuring the existing mounting hole configuration on the underside of your seat pan and installing a compatible universal replacement armrest using basic household hand tools. This straightforward process restores the comfort and functionality of your workspace while saving the expense of purchasing a completely new chair.
What tools do you need before replacing the arm rest?
Before starting the replacement process, you must gather a few standard hand tools, precise measuring instruments, and protective materials to ensure a smooth installation without damaging your chair. Having these items ready beforehand prevents interruptions and protects both the delicate components of the chair and your workspace floor.
The primary hand tools required are screwdrivers and hex keys, also known as Allen wrenches. Most office chairs utilize either Phillips-head screws or hex-socket bolts to secure the armrests to the seat pan. It is highly recommended to have a multi-bit screwdriver set and a complete set of metric and imperial hex keys on hand, as manufacturers use various hardware standards. If your chair uses heavy-duty bolts, a small socket wrench set may also be useful to provide adequate leverage during removal and installation.
Products mentioned in this guide
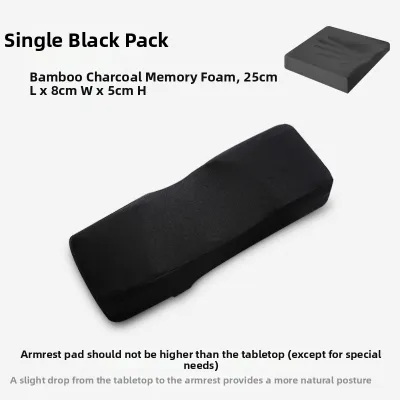
11 Lazada user ratings
I'd tried many different kinds of wrist rests before, even those big metal ones, but they always felt awkward. Then I stumbled upon this one…Read full reviewShow less
I'd tried many different kinds of wrist rests before, even those big metal ones, but they always felt awkward. Then I stumbled upon this one and thought, 'It's not expensive, so why not try it?' It totally opened up a new world for me! I bought one, then another – it's really good! My main goal was to elevate my arm, and this completely fits the bill!
Not bad, the support is very comfortable, the height is just right, and it fits perfectly on the armrest of the office chair.
So good to use, my hand doesn't hover when I use the mouse, it's much more relaxed, and the operation is smoother.
The mattress is very satisfying to use, it's just the right softness and firmness, and it's great value.
Overall, pretty good. The material feels nice and sturdy. Using it has been a good experience.
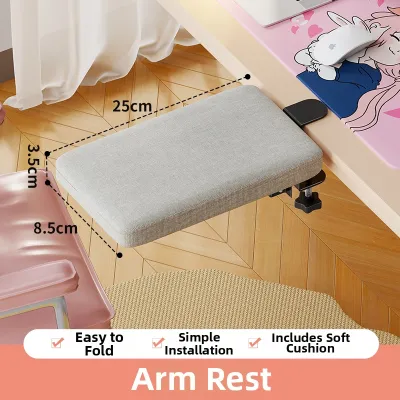
14 Lazada user ratings
If you don't have a power drill at home, you might want to reconsider buying this! The \"no drilling\" feature really means you don’t have t…Read full reviewShow less
If you don't have a power drill at home, you might want to reconsider buying this! The \"no drilling\" feature really means you don’t have to drill holes in your table, but you still need to drill on the extension board to install the bracket. The installation video from the seller makes it sound easy, saying \"just use a screwdriver to make a hole if there isn't one,\" but that’s not actually doable. Underneath this black fabric is a solid piece of material, and they didn’t send any tools for drilling. Am I supposed to just drill into it myself? I reached out to customer service, and they just kept suggesting I try again without offering any tools or a solution. The product page doesn’t mention that buyers need to drill holes themselves. So, just be aware of that.
If you're looking to challenge yourself, this is a unique choice! It's interesting that in 2026, you still need to drill six holes for the h…Read full reviewShow less
If you're looking to challenge yourself, this is a unique choice! It's interesting that in 2026, you still need to drill six holes for the hand rest yourself, which is a bit unusual. It didn't come with a drilling tool, and the adjustment screw was tricky to get in. I had to use some oil to get it to fit, but it was quite an experience!
This is really helpful for people who use a mouse a lot. It eases the strain on the arm, and the off-white color looks clean. The sponge thi…Read full reviewShow less
This is really helpful for people who use a mouse a lot. It eases the strain on the arm, and the off-white color looks clean. The sponge thickness is just right and it's foldable too. The customer service was very thorough in their responses. It's an everyday essential, and I've already recommended it to several friends!
It stays quite flexible even after being fixed in place; just handle it with a bit of care and it works fine.
The board didn't come with any pre-drilled holes, so I had to make my own. I hope it turns out straight!
Prices are valid at publication and may change. Please refer to the product page for the latest price.
For measuring, a standard tape measure with clear millimeter markings is essential, though a digital caliper is the preferred tool for maximum accuracy. Digital calipers allow you to measure the exact outer diameter of the existing bolts and the precise distance between the mounting holes down to a fraction of a millimeter. This precision is crucial because even a tiny mismatch in bolt size or hole spacing can prevent the replacement armrest from mounting securely.
Finally, prepare your workspace by clearing a flat, well-lit area of at least 1.5 by 1.5 meters. Lay down a soft protective barrier, such as a thick towel, a yoga mat, or a large piece of clean cardboard, to protect your floor from scratches and to prevent the chair’s fabric, leather, or plastic components from getting scuffed when you flip the chair over. A small container or magnetic tray is also highly beneficial for holding loose screws, washers, and brackets so they do not roll away during the project.
How do you accurately measure the chair's mounting holes?
To ensure a universal replacement armrest fits your office chair, you must measure the exact center-to-center distance between the mounting holes on the underside of the seat pan and identify the thread size of the existing screws. Taking these measurements carefully prevents the frustration of purchasing an incompatible accessory that cannot be secured to your chair’s frame.
To find the center-to-center distance of the mounting holes, you do not need to guess where the exact middle of each hole lies. Instead, use your tape measure or digital caliper to measure from the far-left edge of the first hole to the far-left edge of the second hole. This edge-to-edge measurement is mathematically identical to the center-to-center distance and is much easier to measure accurately. Write down this dimension in millimeters, as most universal armrest manufacturers specify their compatibility ranges in metric units.
Next, you must determine the correct screw diameter and thread pitch by examining the original hardware. Most office chairs utilize metric fasteners, with M6 (6mm diameter) and M8 (8mm diameter) being the most common sizes. You can determine the diameter by measuring the width of the threaded shaft of an original bolt with your caliper. If you do not have a caliper, you can take one of the original bolts to a local hardware store to test it against a thread matching board, or gently test-thread a known M6 or M8 bolt into the seat pan inserts.
You must also measure the thickness of the seat pan and the depth of the threaded inserts to ensure the replacement screws are the correct length. If the screws are too long, they can pierce through the wooden or plastic seat pan and push into the foam cushion, creating a painful hazard when you sit down. Conversely, if the screws are too short, they will not engage enough threads within the metal insert, which can lead to the threads stripping under the weight of your arms. Ideally, the screw should engage at least five to six full threads, or roughly 8 to 10 millimeters of depth, without bottoming out or pressing against the cushion.
If your chair has a non-standard hole pattern, or if the holes are obstructed by plastic shrouds or fabric flaps, you will need to take extra steps. Carefully peel back or trim any fabric blocking the threaded inserts, and remove any decorative plastic covers using a flathead screwdriver or a plastic prying tool. Fortunately, most universal armrests feature slotted mounting brackets rather than fixed holes. These elongated slots are designed to accommodate a range of hole spacings, typically spanning from 5.5 centimeters to 10 centimeters, which provides significant flexibility for non-standard setups.
How do you align and secure the universal arm rest to the seat?
Securing the new armrest requires aligning the bracket slots with the seat pan’s threaded inserts, starting all fasteners by hand to avoid cross-threading, and tightening them gradually in an alternating sequence. This methodical approach ensures the armrest sits straight, distributes physical load evenly, and prevents damage to the internal threads of the seat.
Begin by removing the old armrests and thoroughly cleaning the mounting area. Over years of use, dust, lint, and spilled liquids can accumulate on the underside of the chair, and old thread-locking compound may remain inside the threaded inserts. Use a dry brush, compressed air, or a slightly damp microfiber cloth to clean the area around the mounting holes, and ensure the threaded inserts are clear of debris so the new bolts can thread smoothly.
Position the new armrest bracket over the mounting holes on the underside of the seat pan. Pay close attention to the orientation of the armrests, as many models are side-specific and are marked with an “L” for left and an “R” for right. Ensure that the forward-sloping or contoured part of the armrest pad points toward the front of the chair. Align the slots in the metal or heavy-duty plastic bracket with the threaded inserts in the seat pan.
Always start threading the screws by hand rather than using a power tool. Insert the screw through the bracket slot and into the threaded insert, turning it clockwise with your fingers for at least three to four full rotations. Starting the screws by hand allows you to feel if the threads are aligning correctly; if you feel immediate resistance, back the screw out and try again. Using an electric drill or impact driver at this stage can easily cross-thread and ruin the metal inserts inside the seat pan, which are very difficult to repair.
Once all screws for an armrest are started by hand, use your screwdriver or hex key to tighten them incrementally using an alternating pattern. If your bracket uses two or three screws, tighten the first screw about halfway, then move to the second screw and tighten it halfway, repeating this process until all screws are snug. This alternating method prevents the bracket from shifting or tilting, which can cause the screws to bind and strip the threads.
Before performing the final tightening, adjust the lateral position of the armrests if the universal bracket allows it. Sliding the brackets inward closer to the seat pan creates a narrower seating profile, while sliding them outward provides more room. Once you have positioned the armrests to match your body width, tighten the screws firmly. Be careful not to over-tighten, especially if your chair has a plastic seat pan or a plywood base, as excessive torque can crack the plastic or pull the threaded metal inserts completely out of the wood.
What should you check to ensure the new arm rest is safe and comfortable?
After tightening the hardware, you must perform a physical stability check and an ergonomic assessment to verify that the armrests are safe to use and properly aligned with your body. Regular checks prevent sudden hardware failure and ensure the replacement supports a healthy sitting posture.
To test the physical stability of the newly installed armrests, grab the armrest pad firmly and apply moderate lateral and downward pressure. Wiggle the armrest back and forth to check for any play, slipping, or wobbling. If you feel any movement or hear creaking sounds, it indicates that the bolts are not fully tightened, the bracket is misaligned, or the screws are too long and have bottomed out before clamping the bracket securely.
Next, inspect the interface between the mounting bracket and the seat pan to ensure there are no visible gaps. The bracket should sit completely flush against the mounting surface. If your chair’s seat pan has a curved bottom and the replacement bracket is flat, look closely to see if the bracket is bending or if the seat pan is flexing under pressure. If necessary, you may need to insert flat washers or rubber spacers between the bracket and the seat pan to distribute the load evenly and prevent structural damage.
Sit in the chair to evaluate the ergonomics of the new armrests. Adjust your chair height so your feet are flat on the floor, and observe how your arms rest. Your shoulders should remain relaxed and level, and your elbows should rest comfortably on the pads at approximately a 90-degree angle while typing or writing. If the universal armrests feature height, angle, or rotation adjustments, fine-tune these settings so your wrists remain in a neutral, straight position to minimize strain during long working sessions.
Finally, establish a safety boundary for your chair’s structural integrity. If you notice any deep cracks forming in the plastic seat pan, if the wood around the mounting area begins to splinter, or if the threaded inserts spin freely inside the seat pan without tightening, stop using the chair immediately. These issues indicate that the seat pan’s structural integrity has been compromised. In such cases, attempting to force the installation or continuing to use the chair can lead to sudden failure and potential injury; instead, consult the chair’s original manufacturer or a professional furniture repair technician to determine if the seat pan can be safely repaired or if the chair must be retired.
Community discussion
Share your experience or ask a question. Comments are reviewed before publication.