
To find the correct replacement wardrobe handle, you must measure the exact distance between the centers of the existing screw holes—known as the center-to-center measurement—along with the overall length, projection, and screw thread specifications. Getting these dimensions right ensures the new hardware aligns perfectly with the pre-drilled holes in your wardrobe door, saving you from drilling new holes or patching up damaged wood or laminate. Replacing worn or outdated hardware is one of the most straightforward ways to refresh your bedroom furniture, but even a tiny measurement error can lead to misaligned handles or visible gaps. By taking systematic measurements of your existing setup, you can confidently select a replacement that installs smoothly and functions reliably.
Safely Removing the Old Wardrobe Handle
Before you can take any accurate measurements, you must remove the existing handle from the wardrobe door. This step requires careful handling to protect the delicate surface of your furniture. Open the wardrobe door fully and support the handle from the outside with one hand while you loosen the mounting screws from the inside. If you leave the handle unsupported, it can drop suddenly as the last screw is released, potentially chipping the wood, scratching the laminate, or damaging the floor below.
Once the handle is detached, you will likely notice a buildup of dust, oils, or adhesive residue around the mounting area. Use a soft, damp microfiber cloth and a mild, non-abrasive cleaner to gently wipe down the surface. Removing this grime ensures that your measuring tools can sit completely flat against the door, which prevents slight angle deviations during measurement. Avoid harsh chemical solvents that could strip the protective varnish or paint finish from your wardrobe door.
Products mentioned in this guide
![[SG Seller]Invisible Recessed Embedded Cabinet Handle Fold Flip Hidden Drawer Pull Knob For Wardrobe Cabinet Cupboard](https://img.lazcdn.com/g/p/643c1d4cb6388b19d04fc7cf0a790dcd.jpg_400x400q80.jpg_.webp)
![[SG Seller]Furniture Recessed Hidden Pull Handle Flush Mount Invisible Drawer Handle For Wardrobe Sliding Cabinet Drawer](https://img.lazcdn.com/g/p/6ac0dd25886022980ce8b00e8bdaa3e8.jpg_400x400q80.jpg_.webp)

Prices are valid at publication and may change. Please refer to the product page for the latest price.
With the surface clean, take a moment to inspect the condition of the existing drill holes. Look closely for any signs of wood splitting, laminate peeling, or structural wear around the edges of the holes. If the wood fibers inside the hole are stripped or enlarged, the new screws may not grip securely. Identifying these issues early allows you to plan for minor repairs, such as using wood filler or inserting small dowels, before you attempt to install the new hardware.
Tools You Need for Accurate Measurement
Achieving a precise fit requires the right tools, as relying on guesswork or visual estimation often leads to purchasing the wrong size. A steel tape measure is the absolute minimum requirement for this task, but a digital caliper is highly recommended for the most accurate results. Calipers allow you to measure down to the fraction of a millimeter, which is incredibly helpful when dealing with international hardware standards that use highly specific dimensions.

You will also need the correct screwdriver to remove the existing hardware without causing damage. Examine the screw heads on the inside of the wardrobe door to determine if they require a flathead, Phillips, or Pozidriv screwdriver bit. Using a mismatched screwdriver can easily strip the screw head, making it extremely difficult to remove the screw or tighten it back up later. If the screws are tight, apply steady, downward pressure while turning to maintain a firm grip.
Finally, prepare a reliable method for recording your findings. A simple notepad and pen work well, or you can use your smartphone to snap photos of the measurements next to your ruler. For handles with complex shapes or multiple mounting points, placing a sheet of paper over the door and rubbing a pencil over the holes creates an exact physical template. This paper template can be carried with you to local hardware stores or compared directly against technical drawings online.
How to Measure the Hole Spacing (Center-to-Center)
The most critical dimension for any two-hole wardrobe handle is the center-to-center distance, often abbreviated as CTC in hardware specifications. This measurement represents the exact distance from the middle of one screw hole to the middle of the other. Do not measure from the outer edges of the handle or from the outer edges of the holes, as these dimensions do not align with standard manufacturing sizes.
To measure this accurately, place your measuring tool flat against the door surface where the handle was mounted. Align the zero mark of your tape measure or the jaw of your caliper with the exact center of the first hole, then read the distance to the exact center of the second hole. If finding the exact center is difficult, you can measure from the left edge of the first hole to the left edge of the second hole; this method yields the identical center-to-center distance.
Always record this measurement in millimeters. The vast majority of furniture hardware, including wardrobe handles, is manufactured using metric standards, with common center-to-center sizes including 96mm, 128mm, 160mm, and 192mm. If your measurement falls slightly off these standard numbers, double-check your alignment. Ensure your measuring tool is perfectly parallel to the line between the holes, as measuring at a slight angle will artificially inflate the distance and lead to ordering the wrong size.
Measuring Overall Length, Width, and Projection
While the hole spacing determines whether a handle will physically fit your wardrobe, the overall length, width, and projection dictate how the handle looks and functions in your space. The overall length is the total end-to-end measurement of the handle. For modern bar pulls, the overall length is often significantly longer than the center-to-center hole spacing because the ends of the bar extend past the mounting posts. Knowing this dimension helps you ensure the handle does not extend past the edge of the door frame.
The width or thickness of the grip area is another important factor for both visual balance and physical comfort. A handle that is too thin might feel flimsy on a heavy wardrobe door, while an excessively thick handle can look bulky and disproportionate. Measure the width of the handle’s face to ensure it complements the style of your wardrobe. This is particularly important if you are trying to match existing hardware on nearby drawers or cabinets.
Projection refers to how far the handle sticks out from the surface of the wardrobe door. To measure this, place a ruler flat against the door and measure the distance to the outermost point of the handle. Adequate projection is essential for comfortable daily use, as there must be enough clearance for your fingers to slip behind the handle easily. Additionally, if your wardrobe doors slide past one another, or if the wardrobe is positioned close to a wall or adjacent furniture, a handle with too much projection could prevent the doors from opening fully or cause damage upon contact.
Identifying the Mounting Type and Screw Specifications
Wardrobe handles are secured using several different mounting methods, and identifying yours is crucial for a seamless replacement. The most common setup involves machine screws that pass through the door from the back and thread directly into the handle. Other configurations might use wood screws that mount directly into the front of the door, or specialized threaded inserts embedded within the wood itself. Take note of how your current handle is attached so you can select a compatible replacement style.
Next, examine the screws themselves. You need to measure both the diameter of the screw thread and the overall length of the screw shaft. Most standard furniture handles use M4 machine screws, which have a 4mm thread diameter, but some heavy-duty hardware may use M6 or standard imperial sizes. Using a screw with the wrong thread pitch or diameter will strip the internal threads of your new handle, rendering it unusable.
The length of the screw must also match the thickness of your wardrobe door. Measure the thickness of the door panel and add the depth of the handle’s threaded hole to find the ideal screw length. If the screw is too short, it will not engage enough threads to hold the handle securely; if it is too long, it will bottom out inside the handle before pulling it tight against the door. If your new handles come with screws that are too long, you may need to purchase shorter M4 screws or use a specialized screw-cutting tool to trim them to size.
Final Verification and Purchasing Checklist
Before you finalize your purchase on any online marketplace or at a local hardware store, run through a final verification process to prevent ordering errors. Start by comparing your recorded center-to-center measurement against the product specifications. Remember that while the overall length of the handle can vary based on your aesthetic preference, the center-to-center distance must match your existing drill holes exactly if you want a direct, drill-free installation.
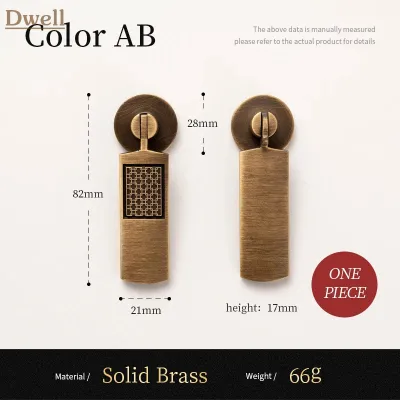
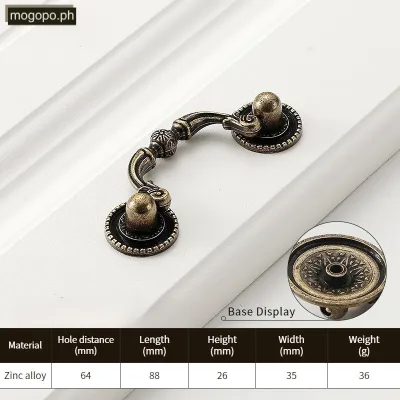
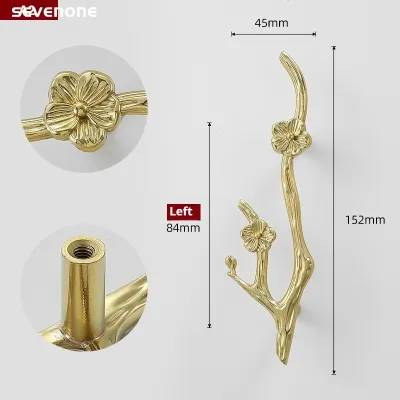
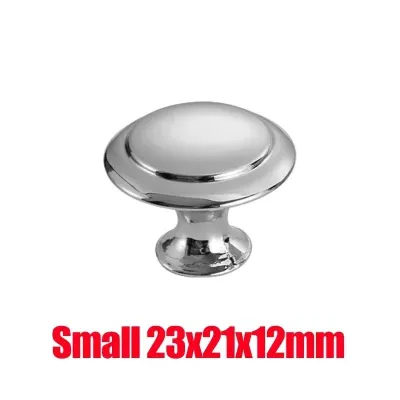
Do not rely solely on the product title or a brief text description, as these can sometimes contain rounded numbers or translation errors. Instead, look for the manufacturer’s technical dimension diagram, which is usually included in the product images. This diagram provides a detailed breakdown of all physical dimensions, including hole spacing, overall length, projection, and thread depth. Comparing your physical measurements directly to this diagram is the most reliable way to guarantee compatibility.
Finally, verify what hardware is included with your purchase. Check if the replacement handles come packaged with mounting screws, and confirm if those screws match the thickness of your wardrobe doors. If your doors are unusually thick or thin, you may need to purchase separate screws. Keeping a detailed checklist of your measurements—including hole spacing, door thickness, screw diameter, and maximum allowable projection—will make your shopping experience straightforward and successful.
Frequently Asked Questions (FAQ)
What if my wardrobe handle has only one screw hole?
If your wardrobe features single-hole knobs or pulls, you do not need to worry about center-to-center spacing. Instead, focus on measuring the diameter of the single screw hole to ensure the new mounting screw will fit through without slipping. You must also measure the base diameter of the existing knob. Choosing a replacement knob with a base diameter that is equal to or larger than the original is highly recommended, as this ensures the new hardware will completely cover any indentations, paint discoloration, or finish wear left behind by the old knob.
Can I install a replacement handle with a different hole spacing?
Yes, you can install a handle with different hole spacing, but it requires additional woodworking steps. You will need to drill new holes in the wardrobe door to accommodate the new dimensions. Before doing so, you must fill the old, exposed holes using a high-quality wood filler or wood dowels glued into place. Once the filler dries, sand the area flat and apply matching paint or varnish to blend the repair into the surrounding door finish. Alternatively, you can install a decorative backplate behind the new handle to physically cover the old holes without the need for extensive sanding and refinishing.
Community discussion
Share your experience or ask a question. Comments are reviewed before publication.