
Building a custom display stand using modular shelving components is an efficient and highly adaptable way to showcase collectibles, books, or retail merchandise. By utilizing interchangeable parts, you gain complete control over the final height, width, and shelf spacing, allowing you to design a unit that perfectly fits your specific environment. The process requires no specialized carpentry skills, relying instead on systematic planning, basic hand tools, and a clear understanding of structural stability.
To successfully build your own display stand, you must transition through key phases: measuring your space, inventorying your components, assembling the frame from the ground up, and implementing crucial safety measures. This approach ensures that your finished stand is not only visually appealing but also structurally sound and capable of supporting your items safely over time.
Planning Your Display Stand Layout and Dimensions
Before purchasing any modular components, you must thoroughly evaluate the physical space where the display stand will reside. Begin by measuring the available floor width and depth, ensuring you account for protruding baseboards, skirting boards, wall plugs, or light switches that might prevent the stand from sitting flush. Vertical clearance is equally critical; measure from the floor to the ceiling or any overhead obstacles, such as light fixtures, air conditioning units, or decorative cornices, to determine the maximum safe height for your build. In compact apartment layouts, maximizing vertical space while keeping a minimal footprint is often key to a successful setup.
Products mentioned in this guide
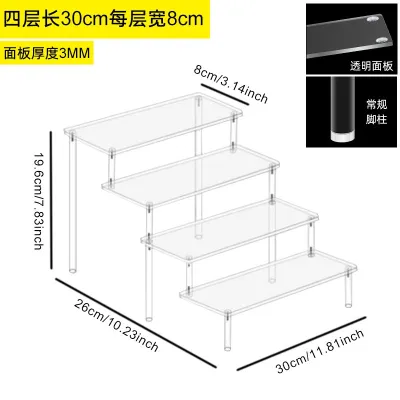

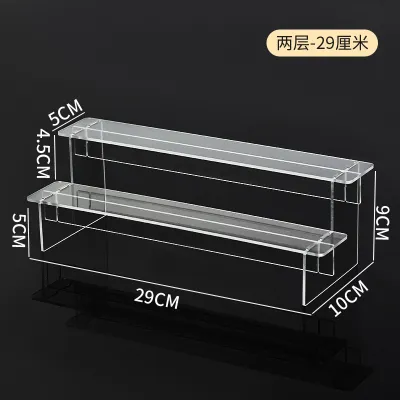

Prices are valid at publication and may change. Please refer to the product page for the latest price.
If you plan to assemble the display stand in a spacious area and then move it to its final location, you must verify its transit path. Measure the clearance of all standard doorways, tight corners, stairwells, and lift doors along the route. Failing to account for these dimensions can result in an assembled unit that is physically impossible to transport to its designated room, forcing a frustrating disassembly and rebuild.
Next, consider the physical characteristics of the items you intend to display. Heavy books, ceramic sculptures, or dense retail products require a much higher load capacity than lightweight collectibles or small decorative items. Estimate the total weight of your display items and distribute this weight across the planned number of shelves to determine the required load capacity per tier. You must cross-reference these estimates with the manufacturer’s official weight ratings, which are typically printed on the component packaging or specification sheets.
With these dimensions and weight requirements in hand, you can calculate the exact inventory of parts needed for your project. Sketch a basic layout to determine the number of vertical uprights, horizontal support beams, shelf panels, and specialized connectors required. Planning this layout in advance prevents mid-project delays caused by missing components and ensures you purchase a cohesive set of parts designed to lock together seamlessly.
Tools and Materials Needed for Assembly
Assembling a modular shelving system generally requires only a few basic hand tools, but having them prepared beforehand ensures a smooth and uninterrupted workflow. A high-quality rubber mallet is often the most critical tool for modular systems, as it allows you to seat joints and beams securely without marring or denting the metal or plastic finish. A reliable spirit level is indispensable for verifying that your uprights are perfectly vertical and your shelves are completely horizontal.

Additionally, keep a standard measuring tape nearby to double-check spacing, along with a set of screwdrivers or Allen keys, depending on the specific fastening hardware used by your modular system. The core materials will consist of your chosen modular components: vertical frames or uprights, horizontal shelf panels, locking clips or structural fasteners, and adjustable leveling feet.
Before you begin the assembly process, clear a large, flat work area and unpack all components. Lay out the parts systematically and compare them directly against the manufacturer’s included parts list. Verifying your physical inventory against the manual before you start allows you to identify any missing fasteners or damaged panels early, saving you from having to halt assembly halfway through.
Step-by-Step Assembly Guide
Assembling your modular display stand is a systematic process that must be executed in a specific order to guarantee structural integrity. By working methodically from the ground up, you prevent minor alignment errors from compounding into major structural issues as the stand grows taller.
Step 1: Preparing the Base and Vertical Supports
The foundation of your display stand dictates its overall stability and safety. Begin by assembling the base frame or threading the adjustable leveling feet into the bottom of the vertical uprights. This step should always be performed on a clean, flat, and level surface—such as a hard floor protected by a drop cloth or cardboard—to prevent scratching the components.
Once the leveling feet are attached, insert the vertical supports into the base connectors or bottom frame. Ensure that each upright is fully seated within its joint; you may need to use a rubber mallet to tap the components gently until they are completely engaged. Loose or partially inserted uprights will cause the entire structure to lean, compromising its load-bearing capacity.
After securing the uprights to the base, place your spirit level against the side of each vertical support to check its plumb, or vertical alignment. If your floor is slightly uneven, which is common in both residential and commercial spaces, use the adjustable leveling feet to compensate. Turn the feet clockwise or counterclockwise until the bubble on your spirit level sits perfectly centered, ensuring a stable, upright foundation.
Step 2: Installing the Shelves and Crossbars
With a stable base established, you can begin installing the horizontal elements that will support your display items. Start by attaching the horizontal beams or shelf clips at your desired heights. Use your measuring tape to measure upward from the base to each attachment point, ensuring that the clips on all four uprights are positioned at the exact same height.
Carefully lower the shelf panels onto the horizontal supports or clips. Press down firmly on each corner of the shelf to ensure that all locking mechanisms, clips, or safety screws are fully engaged and seated. You should hear or feel a distinct click when the components lock into place, indicating that the shelf is secure and ready to bear weight.
Always work systematically from the bottom tier upward. Installing the lower shelves first keeps the center of gravity low during the assembly process, reducing the risk of the partially built stand tipping over. As you install each subsequent shelf, place your spirit level across its surface—both front-to-back and side-to-side—to verify that it remains perfectly horizontal.
Step 3: Securing and Stabilizing the Structure
Once all shelves are in place, you must perform a comprehensive safety and stability check before loading any items onto the stand. Go through the entire structure and inspect every joint, fastener, and locking clip. Apply firm downward pressure to each shelf and gently shake the frame; if you notice any wobbling or play, tighten the corresponding fasteners or use your mallet to seat the joints more securely.
Next, evaluate the necessity of installing anti-tip wall anchoring hardware. The need for anchoring depends heavily on the stand’s height-to-depth ratio, the weight of the items you plan to display, and the overall center of gravity. As a general safety rule, tall, narrow stands or those holding heavy items on upper shelves should always be anchored to a solid wall structure to prevent accidental tipping.
When installing wall anchors, you must match the anchoring hardware to your specific wall type, whether it is drywall, brick, concrete, or timber studs. If you are unsure of your wall’s internal structure, or if the hardware provided by the manufacturer does not match your wall type, stop the installation immediately. Do not attempt to force a generic anchor into an incompatible wall; instead, consult a qualified professional to ensure the stand is anchored safely and securely.
Customizing and Styling Your Modular Display Stand
One of the greatest advantages of a modular display stand is the ability to customize its layout to enhance visual appeal and functionality. By adjusting the heights of individual shelves, you can create distinct visual zones that accommodate items of varying sizes. For example, leaving a taller clearance on a middle shelf draws the eye to a primary focal piece, while tighter spacing on lower shelves is ideal for organizing smaller, uniform items.
To further adapt the stand to your aesthetic or functional needs, consider exploring compatible modular add-ons. Many manufacturers offer optional accessories such as solid side panels, decorative backboards, or integrated drawer inserts. Before purchasing these accessories, always verify that they are fully compatible with your specific shelving model and brand, as modular components are rarely interchangeable between different manufacturers.
Integrating lighting is another highly effective way to elevate your display stand, whether for home decor or retail merchandising. When installing battery-operated LED puck lights or plug-in strip lighting, carefully plan the routing of all cables to keep them hidden and prevent tripping hazards. Always adhere strictly to the lighting manufacturer’s safety instructions regarding clearance, heat dissipation, and power source limits to prevent electrical hazards.
Maintenance and Safety Checks
To ensure the long-term safety and structural integrity of your DIY display stand, you must establish a routine maintenance schedule. Over time, daily use, subtle floor vibrations, and shifting loads can cause mechanical fasteners and joints to loosen slightly. Periodically inspect all connection points and tighten any screws, bolts, or clips that show signs of movement.
Cleaning your display stand regularly helps maintain its appearance, but you must follow the material care labels carefully. Use a soft, damp cloth for general dusting, and avoid harsh chemical cleaners or abrasive pads that could scratch, discolor, or degrade the protective finish of metal, wood, or plastic components. For wooden shelves, use specialized wood cleaners, while metal frames can typically be wiped down with a mild soap solution.
Always monitor how weight is distributed across the shelves over time. To maintain a low center of gravity and maximize stability, place your heaviest items on the bottom shelves and reserve the upper tiers for lighter objects. Avoid overloading any single shelf beyond its rated capacity, and watch for signs of structural stress.
Finally, establish clear criteria for taking the display stand out of service or performing major repairs. If you observe visible bending or bowing in the vertical uprights, cracked plastic connectors, or persistent wobbling that cannot be resolved by tightening fasteners, remove all items from the stand immediately. Do not attempt to load a compromised structure; replace the damaged components or rebuild the stand to ensure safety.
Frequently Asked Questions (FAQ)
Can I expand my modular display stand later?
Yes, most modular shelving systems allow for future expansion, but this depends entirely on the specific brand’s ecosystem and the availability of matching add-on kits. Before purchasing additional parts, check the manufacturer’s specifications to determine the maximum allowable height and width limits for your specific model. Keep in mind that expanding the stand’s dimensions will alter its center of gravity and weight distribution, which means you must reassess your wall anchoring setup to ensure the larger structure remains completely stable.
Do I need to anchor a short display stand to the wall?
While shorter display stands are inherently more stable than tall units, anchoring them to the wall is still highly recommended under certain conditions. If the stand is exceptionally narrow, top-heavy, or positioned in a high-traffic area where it could easily be bumped, anchoring provides an essential layer of safety. Furthermore, if your environment includes active pets or small children who might attempt to climb or pull on the shelves, you should always secure the stand to the wall, regardless of its height, following the specific anti-tip guidelines in the manufacturer’s manual.
Community discussion
Share your experience or ask a question. Comments are reviewed before publication.