
Building a custom open cabinet offers a highly flexible way to maximize storage while maintaining an airy, spacious feel in your home. Whether you want to showcase a curated collection of books, organize daily essentials, or create a dedicated display area, a modular approach allows you to tailor the unit to your exact spatial constraints. By selecting the right components and assembling them systematically, you can construct a durable storage system that fits seamlessly into your living space.
Planning Your Modular Open Cabinet Design and Space
Before purchasing any materials, take precise measurements of the designated area. Measure the height, width, and depth of the space at least twice to ensure accuracy. In Singapore, where high-rise apartments often feature compact layouts or specific structural columns, understanding your exact physical boundaries is essential. Additionally, verify the clearance of your entryways, corridors, stairwells, and service lifts. If you plan to assemble large pre-fabricated sections elsewhere, you must ensure they can physically pass through these tight spaces without damaging the walls or the unit itself.
Next, define what you intend to store to determine the necessary shelf depth and structural strength. Heavy items like books, ceramic dinnerware, or kitchen appliances require robust shelving with a shallow span or extra support beams to prevent sagging. Lightweight decorative items, plants, or folded linens allow for wider spans and more delicate materials. For safety, always design your layout with the heaviest items designated for the lowest shelves.
Products mentioned in this guide
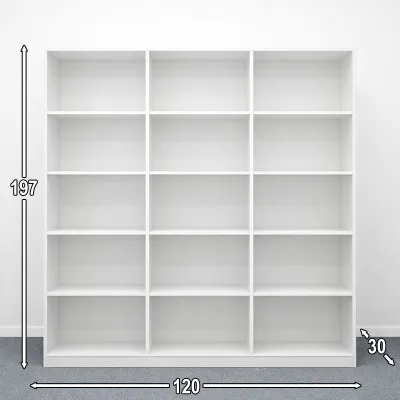
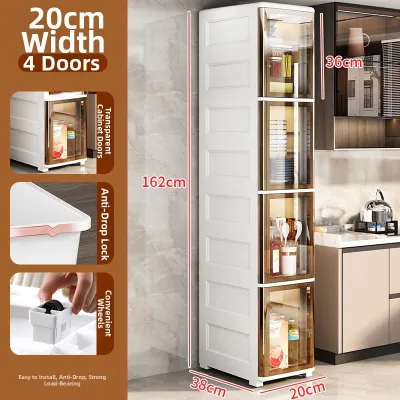
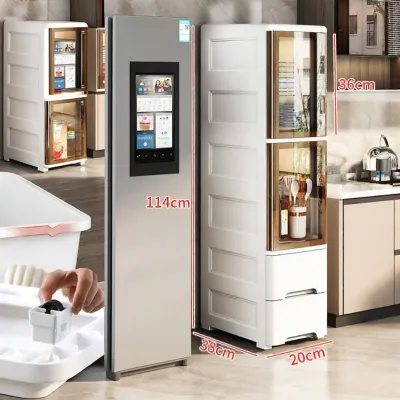
Prices are valid at publication and may change. Please refer to the product page for the latest price.
You must also decide between two primary DIY routes: building completely from raw materials or assembling pre-made modular components. Building from raw materials, such as custom-cut plywood boards and industrial metal pipes, offers complete design freedom but requires advanced woodworking tools and precise cutting skills. Assembling pre-made modular components, such as interlocking wooden cubes or standardized metal shelving units, simplifies the process significantly, making it highly accessible for beginners while still allowing for a customized layout.
Regardless of the path you choose, never assume a material’s strength or durability based on its name alone. A label indicating “wood” or “metal” does not guarantee a specific weight capacity or resistance to wear. Always verify the actual dimensions, load ratings, and specific care instructions on the product labels before finalizing your purchase.
Tools and Materials Checklist for DIY Assembly
Having the correct equipment on hand ensures a smooth, safe, and efficient assembly process. For a standard modular open cabinet project, gather the following essential tools: a power drill with appropriate driver and drill bits, a high-quality spirit level to verify alignment, a metal measuring tape, a pencil for marking reference points, and a reliable stud finder or wall scanner. A wall scanner is particularly important in Singaporean homes, where concrete, brick, or drywall partitions contain hidden electrical conduits or water pipes.

Your material selection will depend on your chosen design route. If you are using pre-fabricated modular units, ensure you have all the panels, connectors, and proprietary fasteners included in the package. For a semi-custom build, you will need plywood or medium-density fibreboard (MDF) shelves, heavy-duty metal brackets, and a variety of wood screws. You must also select the correct wall anchors; standard plastic wall plugs work well for masonry or concrete walls, while toggle bolts or specialized hollow-wall anchors are necessary for drywall partitions.
Safety must remain a priority throughout the assembly. Always wear protective safety goggles when drilling or cutting to shield your eyes from flying debris and dust. Heavy-duty work gloves are also recommended to protect your hands from splinters, sharp metal edges, and tool slips.
Before starting, thoroughly review the manufacturer’s stated weight limits and assembly instructions for any pre-fabricated parts. These specifications are engineered to ensure structural integrity, and deviating from them can lead to premature joint failure or structural collapse.
Step-by-Step Guide to Building Your Open Cabinet
Step 1: Preparing the Base and Frame
A stable open cabinet relies entirely on a perfectly level foundation. Begin by assembling the base or the bottom shelf of your modular unit exactly where you plan to position the finished cabinet. If you build the frame elsewhere and move it later, minor floor variations can distort the structure, leading to misaligned joints and unstable shelves.
Once the base is assembled, place your spirit level flat across the top surface, checking both the left-to-right and front-to-back axes. Even minor floor slopes can compound as you stack modular layers, resulting in a visibly tilted cabinet that is prone to tipping.
If the spirit level indicates an uneven surface, use adjustable leveling feet or high-density wooden shims to correct the alignment. Adjust the feet or slide the shims under the low points of the base until the bubble on the spirit level sits perfectly centered. Secure these adjustments before proceeding to stack any upper layers.
Step 2: Stacking and Connecting Modular Components
With a level base established, you can begin building the vertical structure. If you are using pre-made modular cubes or shelving frames, align the pre-drilled holes carefully. Insert the designated brackets, dowels, or metal connectors provided by the manufacturer to join the sections together.
When securing the joints, tighten all screws and fasteners firmly, but exercise caution to avoid over-tightening. Applying excessive force can easily strip the screw holes or crack engineered wood materials like MDF and particle board, permanently weakening the joint. Use a manual screwdriver for final tightening if your power drill lacks a sensitive clutch setting.
After adding each horizontal layer or vertical module, use your measuring tape to check for squareness. Measure diagonally from the top-left corner to the bottom-right corner of each section, then from the top-right to the bottom-left. If the two diagonal measurements are identical, your frame is perfectly square; if they differ, gently adjust the frame before the joints are fully locked down.
Step 3: Securing and Stabilizing the Structure
Taller open cabinets present a serious tip-over hazard if they are not securely anchored. To prevent accidents, you must anchor the cabinet to the wall, especially if the unit’s height is more than double its depth. Use your stud finder or wall scanner to locate solid framing studs in drywall, or identify a safe drilling zone on concrete walls, avoiding any hidden utility lines.
Drill pilot holes into the wall and insert the appropriate wall plugs. Align the cabinet’s mounting brackets with the wall plugs, then secure them tightly with heavy-duty screws. If your modular design lacks built-in mounting brackets, you can install metal L-brackets underneath the top shelves, securing one side to the cabinet frame and the other to the wall.
If the cabinet still feels slightly wobbly or lacks structural rigidity after assembly, consider installing diagonal cross-bracing or a thin plywood back panel. Cross-bracing adds significant lateral stability, preventing the open cabinet from swaying or leaning under a heavy load.
Stop Condition: If you are unsure of your wall’s material, if your drill hits unexpected resistance that suggests metal plates or structural concrete columns, or if the cabinet remains unstable despite adding bracing, stop immediately. Do not force the installation. Consult a qualified professional carpenter or handyman to complete the anchoring process safely.
Final Inspection and Safe Loading Practices
Before placing any items onto your newly built open cabinet, perform a thorough physical inspection. Gently shake the cabinet from side to side and front to back to check for any residual movement or wobbling. If you detect any play in the joints, trace the source and use a hand tool to re-tighten any loose screws, brackets, or wall anchors.
When you are ready to organize your belongings, implement a safe loading strategy. Always place your heaviest items—such as large books, storage bins, or heavy electronics—on the bottom shelves. This lowers the overall center of gravity of the open cabinet, making it inherently more stable and significantly reducing the risk of tipping. Keep lighter decorative pieces, plants, and smaller items on the upper shelves.
Strictly adhere to the manufacturer’s stated weight capacity for each individual shelf and for the entire unit as a whole. Distribute the weight evenly across the length of each shelf rather than concentrating heavy objects in the center, which can cause the material to bow and eventually fail.
Additionally, protect your shelving materials from environmental damage. In Singapore’s humid tropical climate, moisture can quickly degrade untreated wood or MDF, causing swelling, warping, or mold growth. Avoid placing damp items, unsealed planters, or cold drinks directly onto these surfaces. Instead, use protective silicone mats, coasters, or sealed plastic liners to safeguard the finish.
Customization and Maintenance Tips
An open cabinet offers a versatile canvas for personalization. To enhance both functionality and aesthetics, consider integrating practical accessories. Slide-in fabric drawers or woven rattan baskets can hide smaller, cluttered items while keeping them easily accessible. You can also mount battery-operated, motion-activated LED strip lights under the shelves to illuminate specific display areas without the need for complex electrical wiring.
To keep your cabinet in optimal condition, establish a simple routine maintenance schedule. Dust the shelves regularly with a dry microfiber cloth to prevent buildup. Every few months, inspect the structural joints and wall anchors, gently tightening any screws that may have loosened slightly over time due to daily vibrations or temperature shifts.
When cleaning, always follow the specific care instructions provided on the material’s product label. Avoid using harsh chemical cleaners, abrasive scrubbing pads, or excessive water on wood veneer, laminate, or MDF surfaces, as these can strip protective coatings or cause the edges to peel.
Frequently Asked Questions (FAQ)
Do I need permission to drill into HDB or condo walls for anchoring?
In Singapore, drilling minor holes into non-structural walls to anchor furniture generally does not require formal permission from the Housing & Development Board (HDB) or private condo management. However, drilling into structural reinforced concrete walls, columns, or shared party walls may be subject to strict guidelines, and some condominiums have specific house rules regarding drilling noise and structural alterations. Always check your building’s renovation guidelines or consult your condo management office before commencing any drilling. If drilling is strictly prohibited or if you are renting and cannot modify the walls, utilize freestanding anti-tip devices, heavy base-loading techniques, or consult a professional handyman for non-invasive securing alternatives.
Community discussion
Share your experience or ask a question. Comments are reviewed before publication.